Friday, December 17, 2010

SharePoint - User Profile Properties Provider Web Part

This snippet of code allows you to create a hidden SharePoint Provider Web Part that is used to pass properties from the current user’s profile to consumer web parts.

All of the User Profile properties are populated into a drop down list.

image

When a value is picked, the current user’s property value is displayed. You also have the option to override this value.

image

You can then connect this web part to a consumer web part. In this case, I have created a web part that filters a list based on a certain criteria. One of the query parameters is a user profile property.

image

Source Code
using System;
using System.Collections.Generic;
using System.ComponentModel;
using System.Diagnostics;
using System.Web.UI;
using System.Web.UI.WebControls.WebParts;

namespace Acme.Webparts
{
[ToolboxItemAttribute(false)]
public class UserProfileProviderWebPart : Microsoft.SharePoint.WebPartPages.WebPart, IWebPartField
{
public string UserProfileProperty { get; set; }
public string UserProfileValue {get;set;}
public bool UserProfilePropertyOverride { get; set; }
public string UserProfilePropertyOverrideValue { get; set; }

public override EditorPartCollection CreateEditorParts()
{
List<EditorPart> lstEditorPart = new List<EditorPart>();
UserProfileProviderEditorPart ep = new UserProfileProviderEditorPart();
ep.ID = this.ID + "_EditorPart";
lstEditorPart.Add(ep);
EditorPartCollection epc = base.CreateEditorParts();
return new EditorPartCollection(epc, lstEditorPart);
}

public UserProfileProviderWebPart()
{
this.ChromeType = PartChromeType.None;
}

protected override void CreateChildControls()
{
base.CreateChildControls();
this.Hidden = true;
}

private void HandleException(Exception ex)
{
this.Controls.Clear();
this.Controls.Add(new LiteralControl(ex.ToString()));
Logging.WriteEventLog(ex.ToString(), EventLogEntryType.Error);
}

[ConnectionProvider("Web Part Connection Provider")]
public IWebPartField GetWebPartConnectFieldProvider()
{
return this;
}

public void GetFieldValue(FieldCallback callback)
{
callback.Invoke(this.UserProfileValue);
}

public PropertyDescriptor Schema
{
get
{
return TypeDescriptor.GetProperties(this)["Web Part Connection Provider"];
}
}
}
}
using System;
using System.Collections.Generic;
using System.Web.UI;
using System.Web.UI.WebControls;
using System.Web.UI.WebControls.WebParts;
using Microsoft.Office.Server;
using Microsoft.Office.Server.UserProfiles;
using Microsoft.SharePoint;

namespace Acme.Intranet.Webparts
{
public class UserProfileProviderEditorPart : EditorPart
{
public DropDownList UserPropertyDropDown = new DropDownList();
public Label UserPropertyPrompt = new Label() { Text = "User Property:" };
public Label Message = new Label();

public CheckBox UserPropertyOverride = new CheckBox() { Text = "Override Value:", TextAlign = TextAlign.Right };
public TextBox UserPropertyOverrideValue = new TextBox();

public override bool ApplyChanges()
{
bool returnValue = false;
EnsureChildControls();
UserProfileProviderWebPart s = WebPartToEdit as UserProfileProviderWebPart;
if (s != null)
{
if (UserPropertyOverride.Checked)
{
s.UserProfilePropertyOverride = true;
s.UserProfileValue = UserPropertyOverrideValue.Text;
s.UserProfilePropertyOverrideValue = UserPropertyOverrideValue.Text;
}
else
{
s.UserProfilePropertyOverride = false;
s.UserProfileValue = GetUserPropertyValue();
s.UserProfileProperty = UserPropertyDropDown.SelectedItem.Text;
}
returnValue = true;
}
return returnValue;
}

public override void SyncChanges()
{
EnsureChildControls();
UserProfileProviderWebPart s = WebPartToEdit as UserProfileProviderWebPart;
if (s != null)
{
SetListSelectedIndex(s.UserProfileProperty, UserPropertyDropDown);
UserPropertyOverride.Checked = s.UserProfilePropertyOverride;
UserPropertyOverrideValue.Text = s.UserProfilePropertyOverrideValue;
if (s.UserProfilePropertyOverride)
{
UserPropertyOverrideValue.Text = s.UserProfileValue;
UserPropertyDropDown.Enabled = false;
}
else
{
UserPropertyDropDown.Enabled = true;
}
}
}

private void SetListSelectedIndex(string text, DropDownList ddl)
{
if (!string.IsNullOrEmpty(text))
{
for (int i = 0; i < ddl.Items.Count; i++)
{
if (ddl.Items[i].Text == text)
{
ddl.SelectedIndex = i;
SetPropertyMessage();
break;
}
}
}
}

private void SetPropertyMessage()
{
Message.Text = string.Format("Property: {0}<br />Value: {1}", UserPropertyDropDown.SelectedItem.Text, GetUserPropertyValue());
}

protected override void CreateChildControls()
{
base.CreateChildControls();
this.ChromeType = PartChromeType.None;
LoadControls();
}

private void LoadControls()
{
UserPropertyDropDown.AutoPostBack = true;
UserPropertyDropDown.SelectedIndexChanged += new EventHandler(userPropertyDropDown_SelectedIndexChanged);
UserPropertyOverride.AutoPostBack = true;
UserPropertyOverride.CheckedChanged += new EventHandler(UserPropertyOverride_CheckedChanged);
Controls.Add(UserPropertyDropDown);
Controls.Add(UserPropertyPrompt);
Controls.Add(Message);
Controls.Add(UserPropertyOverride);
Controls.Add(UserPropertyOverrideValue);
LoadUserPropertyValues();
}

void UserPropertyOverride_CheckedChanged(object sender, EventArgs e)
{
if (UserPropertyOverride.Checked)
{
UserPropertyDropDown.Enabled = false;
}
else
{
UserPropertyDropDown.Enabled = true;
}
}

void userPropertyDropDown_SelectedIndexChanged(object sender, EventArgs e)
{
SetPropertyMessage();
}

void LoadUserPropertyValues()
{
foreach (string s in GetPropertyConstants())
{
UserPropertyDropDown.Items.Add(s);
}
}

string GetUserPropertyValue()
{
string propertyValue = string.Empty; ;
using (SPSite site = new SPSite(Shared.GetSiteUrl()))
{
using (SPWeb web = site.OpenWeb())
{
SPUser currentUser = web.CurrentUser;
string loginName = currentUser.LoginName;
try
{
UserProfile profile = null;
ServerContext context = ServerContext.GetContext(site);
UserProfileManager profileManager = new UserProfileManager(context);
if (profile == null)
{
profile = profileManager.GetUserProfile(loginName);
}
if (profile != null)
{
string propertyConstantValue = GetPropertyConstantValue();
propertyValue = profile[propertyConstantValue].Value == null ? string.Empty : profile[propertyConstantValue].Value.ToString();
}
}
catch(Exception ex)
{
propertyValue = ex.ToString() + loginName;
}
}
}
return propertyValue;
}

private List<string> GetPropertyConstants()
{
List<string> fieldList = new List<string>();
System.Reflection.FieldInfo[] fields = typeof(PropertyConstants).GetFields();
foreach (System.Reflection.FieldInfo f in fields)
{
fieldList.Add(f.Name);
}
fieldList.Sort();
return fieldList;
}

private string GetPropertyConstantValue()
{
string fieldContantValue = string.Empty;
System.Reflection.FieldInfo[] fields = typeof(PropertyConstants).GetFields();
foreach (System.Reflection.FieldInfo f in fields)
{
if (f.Name == UserPropertyDropDown.SelectedItem.Text)
{
fieldContantValue = (string)f.GetValue(null);
break;
}
}
return fieldContantValue;
}

protected override void RenderContents(HtmlTextWriter writer)
{
writer.Write("<table border='0'><tr><td>");
UserPropertyPrompt.RenderControl(writer);
writer.Write("</td></tr><tr><td>");
UserPropertyDropDown.RenderControl(writer);
writer.Write("</td></tr><tr><td>");
Message.RenderControl(writer);
writer.Write("</td></tr><tr><td>");
UserPropertyOverride.RenderControl(writer);
writer.Write("</td></tr><tr><td>");
UserPropertyOverrideValue.RenderControl(writer);
writer.Write("</td></tr>");
writer.Write("</table>");
}
}
}

Monday, November 22, 2010

Use C# to generate sample Word and PDF files on the fly!

While doing SharePoint development, I constantly run into a task where I need to add a bunch of random sample files in order to see how content looks when it is populates. I try to keep some sample files handy, but I tend to misplace these, need to target a different type of content, or need a different naming convention. In this example, I wanted to create a handful of HR policies and procedures documents.

Steps:
1. Create a console application in Visual Studio 2010. Make sure it is .NET 4.0.
2. A
dd a reference to “Microsoft Word 14.0 Object Library”. It is likely this will work with 12.0, but I haven’t tested it.
3. Copy and paste the code below. Make sure to update your namespace if necessary.
4. Make sure the variables are setup correctly. You may need to update the SAVE_DIRECTORY constant or use prompt the user with a FolderBrowserDialog. You can also set the CreateMode enum for creating only Word, only PDF, or both. You can also update the list. I tend to add a bunch of values in Excel and then create a simple formula to get them in the format I want. For example: ="docList.Add(" &char(34) & A1 & char(34) & ");"
5. Hit F5!

Note: .NET 4.0 makes working with COM objects much easier and I take advantage of this new functionality in this example. If you plan on using an earlier version, you will have to make a few minor changes. (See references below.) Keep in mind, all of these documents are blank too. You will need to do a little more work to add text.

References
MSDN - Saving Word 2007 Documents to PDF and XPS Formats
COM Interop Gets Much Better in C# 4.0
Sample Human Resources Policies, Checklists, Forms, and Procedures

using
System;
using System.Collections.Generic;
using System.IO;
using Word = Microsoft.Office.Interop.Word;

namespace CreateSampleHRFiles
{
classProgram
{
private enum CreateMode { WordOnly, PdfOnly, Both };
private const string SAVE_DIRECTORY = "c:\\temp\\";
private static Word.Application wordApp = null;
private static Word.Document wordDoc = null;

private static void Main(string[] args)
{
CreateSampleDocuments(FileNames, CreateMode.Both);
}

private static void CreateSampleDocuments(List<string> fileNames, CreateMode createMode)
{
foreach (string fileName in fileNames)
{
string wordFileName = SAVE_DIRECTORY + fileName + ".docx"; ;
string pdfFileName = SAVE_DIRECTORY + fileName + ".pdf";
switch(createMode)
{
caseCreateMode.Both:
CreateWordDoc(wordFileName);
ConvertWordToPdf(wordFileName, pdfFileName);
break;
caseCreateMode.PdfOnly:
CreateWordDoc(wordFileName);
ConvertWordToPdf(wordFileName, pdfFileName);
File.Delete(wordFileName);
break;
caseCreateMode.WordOnly:
CreateWordDoc(wordFileName);
break;
}
}
GC.Collect();
GC.WaitForPendingFinalizers();
GC.Collect();
GC.WaitForPendingFinalizers();
}

private static void CreateWordDoc(string fileName)
{
wordApp = newWord.Application();
object paramMissing = System.Reflection.Missing.Value;
wordDoc = wordApp.Documents.Add(paramMissing, paramMissing, paramMissing, paramMissing);
wordDoc.Activate();
wordApp.Selection.TypeText(fileName.Replace(".docx", "").Replace(SAVE_DIRECTORY, ""));
try
{
wordDoc.SaveAs(fileName, ReadOnlyRecommended: false);
}
catch(Exceptionex)
{
//TODO:
}
finally
{
if(wordDoc != null)
{
wordDoc.Close(SaveChanges: true);
wordDoc = null;
}
if(wordApp != null)
{
wordApp.Quit(SaveChanges: true);
wordApp = null;
}

}
}

private static void ConvertWordToPdf(object paramSourceDocPath, string paramExportFilePath)
{
wordApp = newWord.Application();
object paramMissing = Type.Missing;
Word.WdExportFormat paramExportFormat = Word.WdExportFormat.wdExportFormatPDF;
bool paramOpenAfterExport = false;
Word.WdExportOptimizeFor paramExportOptimizeFor = Word.WdExportOptimizeFor.wdExportOptimizeForPrint;
Word.WdExportRange paramExportRange = Word.WdExportRange.wdExportAllDocument;
int paramStartPage = 0;
int paramEndPage = 0;
Word.WdExportItem paramExportItem = Word.WdExportItem.wdExportDocumentContent;
bool paramIncludeDocProps = true;
bool paramKeepIRM = true;
Word.WdExportCreateBookmarks paramCreateBookmarks = Word.WdExportCreateBookmarks.wdExportCreateWordBookmarks;
bool paramDocStructureTags = true;
bool paramBitmapMissingFonts = true;
bool paramUseISO19005_1 = false;
try
{
wordDoc = wordApp.Documents.Open(ref paramSourceDocPath, ConfirmConversions: true);
if (wordDoc != null)
wordDoc.ExportAsFixedFormat(paramExportFilePath, paramExportFormat, paramOpenAfterExport,
paramExportOptimizeFor, paramExportRange, paramStartPage, paramEndPage, paramExportItem,
paramIncludeDocProps, paramKeepIRM, paramCreateBookmarks, paramDocStructureTags,
paramBitmapMissingFonts, paramUseISO19005_1, ref paramMissing);
}
catch (Exception ex)
{
//TODO:
}
finally
{
if (wordDoc != null)
{
wordDoc.Close(SaveChanges: true);
wordDoc = null;
}
if (wordApp != null)
{
wordApp.Quit(SaveChanges: true);
wordApp = null;
}
GC.Collect();
GC.WaitForPendingFinalizers();
GC.Collect();
GC.WaitForPendingFinalizers();
}
}

public static List<string> FileNames
{
get
{
List<string> docList = new List<string>();
#region docList
docList.Add("Absenteeism and Tardiness Policy");
docList.Add("Access to Personnel Records");
docList.Add("Amendments to Handbook Policy Sample");
docList.Add("Applicant for Jobs - Evaluation Form");
docList.Add("Applicant Self Identification Form - Race Ethnicity");
docList.Add("Application for Internal Job Opportunities");
docList.Add("Armed Services Leave Policy");
docList.Add("At Will Employment Sample Policy");
docList.Add("Attendance Policy Samples");
docList.Add("Benefits Options");
docList.Add("Bereavement Leave");
docList.Add("Blogging and Social Media Policy Sample");
docList.Add("Breaks and Lunch Requirements");
docList.Add("Breast Feeding Accommodation Policy");
docList.Add("Business Casual Dress Code");
docList.Add("Business Casual Dress Code - Manufacturing and Office");
docList.Add("Candidate Evaluation Form");
docList.Add("Candidate Job Offer Letter - Early Career");
docList.Add("Candidate Job Offer Letter - Executive");
docList.Add("Candidate Job Offer Letter - Mid- career");
docList.Add("Candidate Job Offer Letter - Sales Representative");
docList.Add("Candidate Job Offer Letter - Standard");
docList.Add("Candidate Rejection Letter");
docList.Add("Casual Dress Code - Manufacturing and Office");
docList.Add("Cell Phone Policy");
docList.Add("Code of Conduct Outline");
docList.Add("Concealed Weapons Policy");
docList.Add("Confidentiality Agreement");
docList.Add("Counseling Record for Disciplinary Warning Form");
docList.Add("Cover Letter Sample for Review");
docList.Add("Discipline");
docList.Add("Discipline Warning Form- Counseling Record for Disciplinary Warning");
docList.Add("Dress Code - Business Casual");
docList.Add("Dress Code - Casual- Manufacturing and Office");
docList.Add("Dress Code - Customer Interaction and Trade Shows");
docList.Add("Dress Code - Formal, Professional");
docList.Add("Dress Code - Relaxed, Casual");
docList.Add("Dress Code- Letter of Introduction");
docList.Add("Drug Testing - Screening Policy Development");
docList.Add("Drug- free Workplace (Policy Components)");
docList.Add("Email and Internet Sample Policy");
docList.Add("Employee Handbook - Table of Contents");
docList.Add("Employee Handbook Acknowledgement of Receipt");
docList.Add("Employee Handbook Introduction and Purpose");
docList.Add("Employment at Will Sample Policy");
docList.Add("Employment Discrimination Guidelines");
docList.Add("Employment Ending Checklist and Form");
docList.Add("Ethics Code Outline");
docList.Add("Exempt Classification - Non-exempt Classification");
docList.Add("Exit Interviews- Questions for Exit Interviews");
docList.Add("Fair Labor Standards Act (FLSA)");
docList.Add("Family and Medical Leave Act (FMLA)");
docList.Add("Funeral Leave");
docList.Add("Gift Policy");
docList.Add("Glossary of Terms - Dictionary");
docList.Add("Handbook Acknowledgement of Receipt");
docList.Add("Handbook Introduction");
docList.Add("Handbook Table of Contents");
docList.Add("Handbooks");
docList.Add("Harassment - Aids - HIV");
docList.Add("Harassment Investigation Steps");
docList.Add("Health and Safety and Environmental");
docList.Add("Hiring Checklist");
docList.Add("Hiring Forms");
docList.Add("HR Records Access by Employees");
docList.Add("Human Resource Director Job Description");
docList.Add("Human Resources Generalist Job Description");
docList.Add("Human Resources Letters (Samples)");
docList.Add("I- 9 Form- Employment Eligibility for Employers");
docList.Add("Initial Phone Screen");
docList.Add("Internal Job Application");
docList.Add("Internet and Email Acceptable Use Policies");
docList.Add("Internet and Email Policy");
docList.Add("Interview Questions Samples");
docList.Add("Investigation Steps");
docList.Add("Job Application - Internal Transfer");
docList.Add("Job Offer Letter- Early Career");
docList.Add("Job Offer Letter- Executive Job Offer");
docList.Add("Job Offer Letter- Generic");
docList.Add("Job Offer Letter- Mid- career Job Offer");
docList.Add("Job Offer Letter- Sales Representative");
docList.Add("Letter of Resignation Sample");
docList.Add("No Smoking Policy");
docList.Add("Non-exempt Classification - Exempt Classification");
docList.Add("Paid Sick Days Policy");
docList.Add("Paid Time Off (PTO) Policy Sample");
docList.Add("Paid Vacation Days Policy");
docList.Add("Performance Development Plan Form");
docList.Add("Performance Improvement Plan");
docList.Add("Performance Management Process Checklist");
docList.Add("Personnel File Access Policy");
docList.Add("Personnel File Policy");
docList.Add("Phone (Cell) Policy Sample for Workplaces");
docList.Add("Phone Screening - Initial Telephone Interview");
docList.Add("Policy Receipt Acknowledgement Sample");
docList.Add("Progressive Discipline Steps");
docList.Add("Progressive Discipline Warning Form");
docList.Add("Race - Applicant Self Identification Form");
docList.Add("Records - Employee Access to Personnel Records");
docList.Add("Reference Checking Format");
docList.Add("Rejection of Candidate Letter Sample");
docList.Add("Resignation Letter Sample");
docList.Add("Resume Cover Letter Sample");
docList.Add("Resume Sample - Why This Resume Rocks");
docList.Add("Screening Telephone Interview");
docList.Add("Sexual Harassment Complaint - How to Address");
docList.Add("Sick Leave Policy");
docList.Add("Smoke Free Workplace Policy");
docList.Add("Social Media and Blogging Policy Sample");
docList.Add("Space Planning Feedback");
docList.Add("Tardiness and Absenteeism Policy");
docList.Add("Team Norms Sample");
docList.Add("Telephone Screening Format");
docList.Add("Telephone Use Policy - Manufacturing Facility");
docList.Add("Termination Checklist and Form");
docList.Add("The Americans With Disabilities Act Requirements");
docList.Add("Uniformed Services Leave Policy (USERRA)");
docList.Add("Vacation Days Policy");
docList.Add("Weapons (Concealed) Sample Policy");
#endregiondocList
returndocList;
}
}
}
}

Sunday, November 21, 2010

SharePoint 2010 / Visual Studio 2010 – Organizing Project Structures

As I have become more comfortable with the new SharePoint development framework, one thing I had trouble with was how to best organize a project within Visual Studio 2010. While there are plenty of examples on how to develop within the new framework, I haven’t been able to find any good resources or documentation that go into how to best organize your project. After consulting with some co-workers, I have come up with the following generic structure for WebPart projects and UI projects.

  • WebPart Projects – This is typically a project that requires more control over resources and how they get deployed. In this case I use SharePoint Mapped Folders to organize my solution. You can create these at any level and even create multiple levels, but I like the idea of mimicking the actual SharePoint 14 “hive” hierarchy starting with the TEMPLATES folder.
  • UI (MasterPage, Layout, and Branding) Projects -  These are types of resources that I’d like to be more easily accessible by designers and site owners. In this case, I use Module folders to organize my solution. MasterPages are mapped to the site Master Page Gallery _catalogs/masterpage. Layouts, images, and css are deployed to a document library (i.e. the “Style Library” found on Publishing Portals).

Important: Regardless of how you plan on organizing your projects, make sure that you always deploy your resources within a folder with your project name. This lessens the chance of your resources getting overwritten since they would reside in a unique location.  For example, in the WebPart project below, I have a folder under CONTROLTEMPLATES called “Acme.Intranet.WebParts”. In the case of the UI project, I use Modules, so I would need to map these using the Url property of the Module node in the Elements.xml file.

image

Visual Studio 2010 / SharePoint 2010 CKSDEV (Community Tools for SharePoint Development Edition)

One thing I was missing with the new Visual Studio 2010 toolset for SharePoint 2010 was some of nice functionality that WSPBuilder provided. I don’t always want to deploy the whole solution. Sometimes I just want to update the assemblies for an existing solution in the GAC or move over a few images or ascx files. Fortunately, all of this is available with CKSDEV extension for Visual Studio 2010.

Download CKSDEV (Community Tools for SharePoint Development Edition)
http://cksdev.codeplex.com/

Project Level

image

Item Level

image

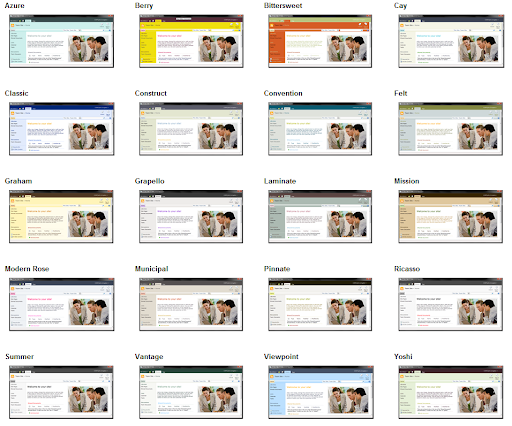
SharePoint 2010 Site Theme Screenshots

SharePoint 2010 has 20 out of the box site themes and while you can preview them within the browser, this takes a few seconds to render.

Indivisual Images (Click to open full-size)

Azure
Azure
Berry
Berry
Bittersweet
Bittersweet
CayCay
Classic
Classic
Construct
Construct
Convention
Convention
Felt
Felt
Graham
Graham
Grapello
Grapello
Laminate
Laminate
Mission
Mission
Modern Rose
Modern Rose
Municipal
Municipal
Pinnate
Pinnate
Ricasso
Ricasso
Ricasso
Summer
Summer
Vantage
Vantage
Viewpoint
Yoshi
Yoshi

Single Image with all site themes (Click to open in browser, or right-click to download.)SharePoint 2010 Themes

Tuesday, September 14, 2010

SharePoint 2010 Object Model Development Tips

I learned a couple things today as I tried to create a simple Console Application. By default, the SharePoint project templates have everything preconfigured, but the out of the box defaults used by the Console Application project template will not support this.

1.) Your target framework must be .NET Framework 3.5. You can do this when you create a new project or by updating the following:
Project -> Properties -> Application -> Target framework

2.) Your debug configuration must use x64 as its active solution platform. Otherwise you're going to get a very non-intuitive message like the following:

"Retrieving the COM class factory for component with CLSID {BDEADF26-C265-11D0-BCED-00A0C90AB50F} failed due to the following error: 80040154 Class not registered (Exception from HRESULT: 0x80040154 (REGDB_E_CLASSNOTREG))."

You can change this by picking Configuration Manager from the Build menu or from the Solution Configurations drop down menu in your toolbar. Make sure the Active Solution Platform is not x86.

Monday, June 7, 2010

Create an Excel workbook from a DataSet using Open XML SDK

Here is a simple code snippet for creating Excel workbooks from a DataSet using Open XML SDK. It will create a tab for each DataTable object and apply some basic formatting.

Steps
1.  Open a project in Visual Studio. In my case, I used a Web Application project.
2.  Add a reference to the following assemblies:
     Document.OpenXml (C:\Program Files\Open XML SDK\V2.0\lib)
          (Download here: Open XML SDK 2.0 for Microsoft Office)
     DocumentFormat.OpenXml.Extensions
            
(Download here: Simple OOXML)
     WindowsBase (GAC)
3.  Add a class called ExcelUtility with the following code:
using System.Data;
using System.IO;
using System.Linq;
using DocumentFormat.OpenXml.Extensions;
using DocumentFormat.OpenXml.Packaging;
using DocumentFormat.OpenXml.Spreadsheet;

namespace AcmeCompany
{
    public class ExcelUtility
   
{
        public static MemoryStream GetStreamFromDataSet(DataSet ds)
        {
            MemoryStream stream = SpreadsheetReader.Create();
            using (SpreadsheetDocument spreadSheet =
                SpreadsheetDocument.Open(stream, true))
            {
                for (int i = 0; i < ds.Tables.Count; i++)
                {
                    WorksheetPart newWorkSheetPart =
                        spreadSheet.WorkbookPart.AddNewPart<WorksheetPart>();
                    newWorkSheetPart.Worksheet = new Worksheet(new SheetData());
                    newWorkSheetPart.Worksheet.Save();
                    Sheets sheets =
                        spreadSheet.WorkbookPart.Workbook.GetFirstChild<Sheets>();
                    string relationshipId =
                        spreadSheet.WorkbookPart.GetIdOfPart(newWorkSheetPart);
                    uint sheetId = (uint)i;
                    if (sheets.Elements<Sheet>().Count() > 0)
                    {
                        sheetId = sheets.Elements<Sheet>().Select(s =>
                            s.SheetId.Value).Max() + 1;
                    }
                    Sheet sheet = new Sheet()
                        {
                            Id = relationshipId, SheetId = sheetId,
                            Name = ds.Tables[i].TableName
                        };
                    sheets.Append(sheet);
                    WorksheetWriter writer =
                        new WorksheetWriter(spreadSheet, newWorkSheetPart);
                    SpreadsheetStyle style =
                        SpreadsheetReader.GetDefaultStyle(spreadSheet);
                    style.SetBorder("000000", BorderStyleValues.Thin);
                    style.IsBold = true;
                    for (int x = 0; x < ds.Tables[i].Columns.Count; x++)
                    {
                        string columnName = GetExcelColumnValue(x + 1);                      
                        writer.PasteText(columnName + "1",
                            ds.Tables[i].Columns[x].ColumnName, style);
                    }
                    style.IsBold = false;
                    writer.PasteDataTable(ds.Tables[i], "A2", style);
                    spreadSheet.WorkbookPart.Workbook.Save();
                }
                //Remove first 3 default tabs (Sheet1 ~ Sheet3)
               
spreadSheet.WorkbookPart.Workbook.Sheets.FirstChild.Remove();
                spreadSheet.WorkbookPart.Workbook.Sheets.FirstChild.Remove();
                spreadSheet.WorkbookPart.Workbook.Sheets.FirstChild.Remove();
            };
            return stream;
        }

        private static string GetExcelColumnValue(int columnNumber)
        {
            if (columnNumber <= 26)
            {
                return ((char)(columnNumber + 64)).ToString();
            }
            columnNumber--;
            return GetExcelColumnValue(columnNumber / 26) +
                GetExcelColumnValue((columnNumber % 26) + 1);
        }       
    }
}

4.  Create some test code:

using System;
using System.Data;
using System.IO;

namespace AcmeCompany
{
    public partial class _Default : System.Web.UI.Page
   
{
        protected void Page_Load(object sender, EventArgs e)
        {
            DataSet ds = GetSampleData();
            string fileName = "test.xlsx";
            MemoryStream ms = ExcelUtility.GetStreamFromDataSet(ds);
            Response.Clear();
            Response.AddHeader("content-disposition", String.Format("attachment;filename={0}", fileName));
            Response.ContentType = "application/vnd.openxmlformats-officedocument.spreadsheetml.sheet";
            ms.WriteTo(Response.OutputStream);
            Response.End();

            //string filePath = @"c:\test.xlsx";
            //FileStream fs = File.OpenWrite(filePath);
            //fs.Write(ms.ToArray(), 0, ms.ToArray().Length);
            //fs.Close();
       
}

        public DataSet GetSampleData()
        {
            DataSet ds = new DataSet();

            DataTable dt1 = new DataTable();
            dt1.TableName = "Tab 1";
            dt1.Columns.Add("Column 1");
            dt1.Columns.Add("Column 2");
            dt1.Columns.Add("Column 3");
            DataRow r1 = dt1.NewRow();
            r1.ItemArray = new object[] { "asdf1", "asdf1", "asdf1" };
            dt1.Rows.Add(r1);
            r1 = dt1.NewRow();
            r1.ItemArray = new object[] { "asdf2", "asdf2", "asdf2" };
            dt1.Rows.Add(r1);
            r1 = dt1.NewRow();
            r1.ItemArray = new object[] { "asdf3", "asdf3", "asdf3" };
            dt1.Rows.Add(r1);
            r1 = dt1.NewRow();
            r1.ItemArray = new object[] { "asdf3", "asdf3", "asdf3" };
            dt1.Rows.Add(r1);

            DataTable dt2 = new DataTable();
            dt2.TableName = "Tab 2";
            dt2.Columns.Add("Column a");
            dt2.Columns.Add("Column b");
            dt2.Columns.Add("Column c");
            DataRow r = dt2.NewRow();
            r.ItemArray = new object[] { "asdf12", "asdf12", "asdf12" };
            dt2.Rows.Add(r);
            r = dt2.NewRow();
            r.ItemArray = new object[] { "asdf22", "asdf22", "asdf22" };
            dt2.Rows.Add(r);
            r = dt2.NewRow();
            r.ItemArray = new object[] { "asdf32", "asdf32", "asdf32" };
            dt2.Rows.Add(r);
            r = dt2.NewRow();
            r.ItemArray = new object[] { "asdf32", "asdf32", "asdf32" };
            dt2.Rows.Add(r);

            ds.Tables.Add(dt1);
            ds.Tables.Add(dt2);

            return ds;
        }
    }
}

Screenshots

image

image

Thursday, May 27, 2010

Dynamic Silverlight Theme Switcher

I was recently trying to determine how easy it would be to add theme changing functionality into my Silverlight apps. The Silverlight Toolkit provides 11 very nice looking themes, so it would be nice to give users the option to switch between themes.

After doing some research, I found that you can instantiate a theme, add content to the theme, and then add the theme as a child of another control. What I have done here is create a simple UserControl that has a StackPanel for showing the theme and a ComboBox for picking a theme. I have a separate page called Content that has some sample controls on it. This could be any page of your choosing and integrated with any project fairly easily. I have provided code summary, screenshots, and full code below.

Code Summary
When a theme is chosen, the following happens:

1. A Content control is instantiated.
Content c = new Content();
2. Based on what is chosen in a ComboBox, a Theme object is instantiated, and the Content object is added as the Content.
Theme t = new BubbleCremeTheme() { Content = c };
3. The Theme object is added as a child to a StackPanel on your main control.
ThemePanel.Children.Add(t);

Screenshots

Design View – MainPage.xaml
image
Design View – Content.xaml
image
Running - No Theme
image
Running - Picking a Theme
image
Running - Expression Dark Theme selected
image

Steps:

1. Create a Silverlight application in Visual Studio. I called mine “Theme Switcher”.
2. In the Web Application Project, add a folder to your ClientBin folder called “images”.
3. Add an image for each themes to this folder. You can make your own or get them from Silverlight Toolkit site. For simplicity, I renamed all of mine to the theme name. For example, “Rainier Orange.png”.
4. In the Silverlight application, add all of the assemblies as references. You can find these in the directory where you installed the Silverlight Toolkit. For example:
C:\Program Files\Microsoft SDKs\Silverlight\vX.X\Toolkit\MMMYY\Themes
5. Add a UserControl called Content.xaml and update the XAML and code behind as follows:
XAML
<UserControl x:Class="ThemeSwitcher.Content"
xmlns="http://schemas.microsoft.com/winfx/2006/xaml/presentation"
xmlns:x="http://schemas.microsoft.com/winfx/2006/xaml"
xmlns:d="http://schemas.microsoft.com/expression/blend/2008"
xmlns:mc="http://schemas.openxmlformats.org/markup-compatibility/2006"
xmlns:data="clr-namespace:System.Windows.Controls;assembly=System.Windows.Controls.Data"
mc:Ignorable="d"
d:DesignHeight="265"d:DesignWidth="400">
<
Gridx:Name="LayoutRoot"Height="265"Background="Transparent"Margin="5,5">
<
Grid.RowDefinitions>
<
RowDefinition Height="Auto" />
<
RowDefinition Height="Auto" />
<
RowDefinition Height="Auto" />
<
RowDefinition Height="Auto" />
<
RowDefinition Height="Auto" />
<
RowDefinition Height="Auto" />
<
RowDefinition Height="Auto" />
<
RowDefinition Height="Auto" />
</
Grid.RowDefinitions>
<
TextBlock Text="TextBlock"Grid.Row="0"Margin="3,3" />
<
ComboBox Grid.Row="1"Margin="3,3">
<
ComboBoxItem Content="ComboBoxItem1"IsSelected="True" />
<
ComboBoxItem Content="ComboBoxItem2" />
<
ComboBoxItem Content="ComboBoxItem3" />
<
ComboBoxItem Content="ComboBoxItem4" />
<
ComboBoxItem Content="ComboBoxItem5" />
</
ComboBox>
<
StackPanel Orientation="Horizontal"Grid.Row="2"Margin="3,3"VerticalAlignment="Center">
<
RadioButton Content="RadioButton1"Margin="3,3" />
<
RadioButton Content="RadioButton2"Margin="3,3" />
<
RadioButton Content="RadioButton3"Margin="3,3" />
</
StackPanel>
<
StackPanel Orientation="Horizontal"Grid.Row="3"Margin="3,3"VerticalAlignment="Center">
<
CheckBox Content="CheckBox1"Margin="3,3" />
<
CheckBox Content="CheckBox2"Margin="3,3" />
<
CheckBox Content="CheckBox3"Margin="3,3" />
</
StackPanel>
<
ListBox Grid.Row="4"Grid.RowSpan="2"Margin="3,3">
<
ListBoxItem Content="ListBoxItem1" />
<
ListBoxItem Content="ListBoxItem2" />
<
ListBoxItem Content="ListBoxItem3" />
<
ListBoxItem Content="ListBoxItem4" />
</
ListBox>
<
SliderGrid.Row="6"Margin="3,3" />
<
ButtonContent="Button"Grid.Row="7"Margin="3,3" />
</
Grid>
</
UserControl>
6. Update the MainPage XAML and code behind like the following:
XAML
<UserControl x:Class="ThemeSwitcher.MainPage"
xmlns="http://schemas.microsoft.com/winfx/2006/xaml/presentation"
xmlns:x="http://schemas.microsoft.com/winfx/2006/xaml"
xmlns:d="http://schemas.microsoft.com/expression/blend/2008"
xmlns:mc="http://schemas.openxmlformats.org/markup-compatibility/2006"
xmlns:local="clr-namespace:ThemeSwitcher"
mc:Ignorable="d"
d:DesignHeight="325" d:DesignWidth="400" Height="325" Width="400">
<
Border CornerRadius="5" BorderBrush="Gray" BorderThickness="1">
<
Grid x:Name="LayoutRoot" Margin="2,2">
<
Grid.RowDefinitions>
<
RowDefinition Height="270" />
<
RowDefinition Height="50*" />
</
Grid.RowDefinitions>
<
Grid.ColumnDefinitions>
<
ColumnDefinition Width="100" />
<
ColumnDefinition />
</
Grid.ColumnDefinitions>
<
Border CornerRadius="5" BorderBrush="Silver" BorderThickness="1"
Grid.Row="0" Grid.ColumnSpan="2" Margin="3">
<
StackPanel x:Name="ThemeDisplay" />
</
Border>
<
TextBlock Text="Select Theme:" FontWeight="Bold" Grid.Row="1" Grid.Column="0"
VerticalAlignment
="Center" Margin="3,3" />
<
ComboBox x:Name="ThemeSelector" Grid.Row="1" Grid.Column="1"
SelectionChanged
="ThemeSelector_SelectionChanged" Margin="3,3">
<
ComboBox.ItemTemplate>
<
DataTemplate>
<
StackPanel Orientation="Horizontal">
<
Image Source="{Binding ImageUrl}" />
<
TextBlock Text="{Binding ThemeTitle}" FontWeight="Bold" Margin="3,3,3,3"
VerticalAlignment
="Center" />
</
StackPanel>
</
DataTemplate>
</
ComboBox.ItemTemplate>
</
ComboBox>
</
Grid>
</
Border>
</
UserControl>
Code Behind
using System;
using System.Collections.Generic;
using System.Linq;
using System.Windows.Controls;
using System.Windows.Controls.Theming;
using System.Windows.Media;

namespace ThemeSwitcher
{
public classThemeSelectorInfo
{
public ImageSource ImageUrl { get; set; }
public string ThemeTitle { get; set; }
}
public partial class MainPage : UserControl
{
public MainPage()
{
InitializeComponent();
string[] themes = { "Bubble Creme", "Expression Dark",
"Expression Light", "Rainier Orange",
"Rainier Purple", "Shiny Blue",
"Shiny Red", "Twilight Blue"};
List<ThemeSelectorInfo> themeInfo =
(from t inthemes
select newThemeSelectorInfo()
{
ImageUrl = new System.Windows.Media.Imaging.BitmapImage(
new Uri("images/" + t + ".png", UriKind.Relative)),
ThemeTitle = t
}).ToList();
themeInfo.Insert(0,
new ThemeSelectorInfo() { ThemeTitle = "No Theme" });
ThemeSelector.ItemsSource = themeInfo;
ThemeSelector.SelectedIndex = 0;
}

private void ThemeSelector_SelectionChanged(object sender,
SelectionChangedEventArgs e)
{
Content c = new Content();
Theme t = new ExpressionDarkTheme();
if (ThemeDisplay != null)
{
ThemeDisplay.Children.Clear();
switch (((ThemeSelectorInfo)ThemeSelector.SelectedItem).ThemeTitle)
{
case "Bubble Creme":
t = new BubbleCremeTheme() { Content = c };
break;
case "Expression Dark":
t = new ExpressionDarkTheme() { Content = c };
break;
case "Expression Light":
t = new ExpressionLightTheme() { Content = c };
break;
case "No Theme":
break;
case "Rainier Orange":
t = new RainierOrangeTheme() { Content = c };
break;
case "Rainier Purple":
t = new RainierPurpleTheme() { Content = c };
break;
case "Shiny Blue":
t = new ShinyBlueTheme() { Content = c };
break;
case "Shiny Red":
t = new ShinyRedTheme() { Content = c };
break;
case "Twilight Blue":
t = new TwilightBlueTheme() { Content = c };
break;
}
if (t.Content != null)
{
ThemeDisplay.Children.Add(t);
}
else
{
c.Foreground = new SolidColorBrush(Colors.Black);
c.LayoutRoot.Background =
new SolidColorBrush(Colors.White);
ThemeDisplay.Children.Add(c);
}
}
}
}
}

Notes:
1. I have not included BureauBlue, BureauBlack, and WhistlerBlue as there is currently a bug related to XamlParseExceptions. I am using the 11/09 release of the Silverlight 3.0 Toolkit in this example, so this may not be a problem in the newer versions.
2. The Background property of the LayoutRoot grid is White by default. Whenever you use these themes, you should always change this to Transparent.
3. If you do add theme changing functionality, remember that each reference make to a theme assembly increased the size of your XAP file. You can find more information here:
How to: Use Application Library Caching
image