Friday, February 19, 2010

Create a sample text generator system tray tool with C#

There are a ton of great websites that allow you to generate sample text, but I’ve always wanted one that I can access quickly and easily, especially when I am doing some testing. Here is one that can be easily created and runs in your system tray. The code is simple enough that you can add more options like DBCS text generator.

image

Steps
1. Open Visual Studio and create a Windows Forms Application.
2. Add a new or existing Icon File to be shown in your system tray.
3. Add a ContextMenuStrip control the the form and rename it “contextMenuStrip”.
4. Add a NotifyIcon control to your form and rename it “notifyIcon”.
i. Change the Text to “TextGenerator”.
ii. Change the Icon to the one you added in Step 2.
iii. Change the ContextMenuStrip to the one in Step 3.
5. Add the following code to the Form code behind. (Alternatively you can use the designer to some of this code, but I find it more scalable if I do it in code.)

using System;
using System.Diagnostics;
using System.Windows.Forms;

namespace TextGenerator
{
public partial class Form1 : Form
{
public bool ShowTooltips { get; set; }
public int DefaultCharLength { get; set; }
public string SampleText = "Lorem ipsum dolor sit amet, consectetur adipiscing elit. Donec consequat " +
"dolor auctor tortor tincidunt tristique sit amet et arcu. Vivamus dui risus, hendrerit quis rhoncus" +
"vel, consequat ut augue. Quisque congue nisi id enim lobortis vitae pellentesque nulla euismod." +
"Aenean ante risus, feugiat vel facilisis non, iaculis ac augue. Phasellus in mollis est. Suspendisse" +
"potenti. Vestibulum gravida sem enim. Vestibulum vel dui id odio vulputate fringilla. Curabitur " +
"bibendum lorem a nisi posuere sit amet tincidunt diam condimentum. Fusce in tellus urna. Suspendisse" +
"condimentum tortor et mi luctus facilisis. Fusce tincidunt augue vitae odio luctus posuere. Phasellus" +
"ac turpis metus, pharetra tempor lectus. Sed eget massa sit amet lacus faucibus blandit in a risus." +
"Phasellus dui dolor, pulvinar vitae cursus pharetra, porttitor in augue. Donec tristique dignissim " +
"diam in sollicitudin. Integer luctus elit a orci tristique sit amet pulvinar erat tempor. Maecenas " +
"sit amet aliquam libero. Sed tincidunt justo at velit sollicitudin vel vehicula turpis ultrices. " +
"Etiam erat nulla, vehicula non viverra non, porta eu elit. Proin commodo adipiscing nisl nec pretium." +
"Nam lacinia posuere varius. Cras mollis rutrum felis, venenatis lobortis mi imperdiet non. Lorem ipsum" +
"dolor sit amet, consectetur adipiscing elit. Nam id nisi lorem, non pulvinar erat. Donec sit amet velit" +
"eu velit varius imperdiet sit amet vitae leo. Nulla malesuada, dolor sit amet tincidunt fermentum, " +
"mauris nisl posuere nisi, a consequat leo risus ut nibh. In a sapien eu lectus lobortis lacinia. " +
"Pellentesque sit amet lacus sem, non molestie sapien. Duis at enim magna. Integer vitae mi purus, id " +
"rutrum neque. Mauris vitae sem nulla, at accumsan odio. Quisque pulvinar, urna ut aliquam tristique, " +
"magna magna ornare tortor, ut adipiscing nunc nisi et ipsum. Nam porttitor sodales porta. Cras " +
"ullamcorper libero ut sem dapibus ac dapibus tellus scelerisque. Mauris a nisi nec odio varius " +
"iaculis. Integer vel massa eget nunco volutpati.";
public Form1()
{
InitializeComponent();
this.WindowState = FormWindowState.Minimized;
}

private void Form1_Load(object sender, EventArgs e)
{
ShowTooltips = false;
DefaultCharLength = 100;
this.Visible = false;
this.WindowState = FormWindowState.Minimized;

if (Process.GetProcessesByName(Process.GetCurrentProcess().ProcessName).Length > 1)
{
MessageBox.Show("An instance of TextGenerator is already running.\r\nCheck your system tray.");
System.Threading.Thread.Sleep(3000);
this.Close();
}

ToolStripMenuItem defaultText = new ToolStripMenuItem("Default Character Length");
ToolStripMenuItem defaultText50 = new ToolStripMenuItem("50");
defaultText50.Click += new EventHandler(defaultText_Click);
ToolStripMenuItem defaultText100 = new ToolStripMenuItem("100");
defaultText100.Checked = true;
defaultText100.Click += new EventHandler(defaultText_Click);
ToolStripMenuItem defaultText250 = new ToolStripMenuItem("250");
defaultText250.Click += new EventHandler(defaultText_Click);
ToolStripMenuItem defaultText500 = new ToolStripMenuItem("500");
defaultText500.Click += new EventHandler(defaultText_Click);
ToolStripMenuItem defaultText1000 = new ToolStripMenuItem("1000");
defaultText1000.Click += new EventHandler(defaultText_Click);
ToolStripMenuItem defaultText2000 = new ToolStripMenuItem("2000");
defaultText2000.Click += new EventHandler(defaultText_Click);
defaultText.DropDownItems.Add(defaultText50);
defaultText.DropDownItems.Add(defaultText100);
defaultText.DropDownItems.Add(defaultText250);
defaultText.DropDownItems.Add(defaultText500);
defaultText.DropDownItems.Add(defaultText1000);
defaultText.DropDownItems.Add(defaultText2000);

ToolStripMenuItem copy50 = new ToolStripMenuItem("Copy 50") { Tag = 50 };
copy50.Click += new EventHandler(copy_Click);
ToolStripMenuItem copy100 = new ToolStripMenuItem("Copy 100") { Tag = 100 };
copy100.Click += new EventHandler(copy_Click);
ToolStripMenuItem copy250 = new ToolStripMenuItem("Copy 250") { Tag = 250 };
copy250.Click += new EventHandler(copy_Click);
ToolStripMenuItem copy500 = new ToolStripMenuItem("Copy 500") { Tag = 500 };
copy500.Click += new EventHandler(copy_Click);
ToolStripMenuItem copy1000 = new ToolStripMenuItem("Copy 1000") { Tag = 1000 };
copy1000.Click += new EventHandler(copy_Click);
ToolStripMenuItem copy2000 = new ToolStripMenuItem("Copy 2000") { Tag = 2000 };
copy2000.Click += new EventHandler(copy_Click);

ToolStripMenuItem exit = new ToolStripMenuItem("Exit");
exit.Click += new EventHandler(exit_Click);

ToolStripMenuItem options = new ToolStripMenuItem("Options");
ToolStripMenuItem showToolTipItem = new ToolStripMenuItem("Show Tooltips");
showToolTipItem.Click += new EventHandler(showToolTipItem_Click);
options.DropDownItems.Add(showToolTipItem);

contextMenuStrip.Items.Add(defaultText);
contextMenuStrip.Items.Add(copy50);
contextMenuStrip.Items.Add(copy100);
contextMenuStrip.Items.Add(copy250);
contextMenuStrip.Items.Add(copy500);
contextMenuStrip.Items.Add(copy1000);
contextMenuStrip.Items.Add(copy2000);

contextMenuStrip.Items.Add(new ToolStripSeparator());

contextMenuStrip.Items.Add(options);
contextMenuStrip.Items.Add(exit);
}

void showToolTipItem_Click(object sender, EventArgs e)
{
ToolStripMenuItem showToolTipItem = sender as ToolStripMenuItem;
ShowTooltips = !showToolTipItem.Checked;
showToolTipItem.Checked = !showToolTipItem.Checked;
}


void exit_Click(object sender, EventArgs e)
{
this.Close();
}

void defaultText_Click(object sender, EventArgs e)
{
foreach (ToolStripMenuItem childItem in ((ToolStripMenuItem)((ToolStripMenuItem)sender).OwnerItem).DropDownItems)
{
childItem.Checked = false;
}
((ToolStripMenuItem)sender).Checked = true;
DefaultCharLength = Convert.ToInt32(((ToolStripMenuItem)sender).Text);
CopyToClipboard(DefaultCharLength);
}

void copy_Click(object sender, EventArgs e)
{
CopyToClipboard(Convert.ToInt32(((ToolStripMenuItem)sender).Tag));
}

private void notifyIcon_MouseClick(object sender, MouseEventArgs e)
{
if (e.Button == MouseButtons.Left)
{
CopyToClipboard(DefaultCharLength);
}
}

private void CopyToClipboard(int characters)
{
try
{
Clipboard.SetText(SampleText.Substring(0, characters));
if (ShowTooltips)
{
notifyIcon.ShowBalloonTip(50, "TextGenerator", "Copied " + characters.ToString() + " characters to the clipboard.", ToolTipIcon.Info);
}
}
catch (Exception ex)
{
notifyIcon.ShowBalloonTip(10, "TextGenerator", "Unknown Error: " + ex.ToString(), ToolTipIcon.Error);
}
}
}
}
6. Hit F5 and run!


Instructions
1. Left-Click to copy default characters.
2. Right-click to copy a different amount of characters or set the default character link.
References
Sample text taken from LoremIpsum.

Tuesday, February 16, 2010

Download SharePoint List Attachments – Code Sample

Here is a simple code sample for downloading SharePoint List Item attachments. When the code is run all attachments are downloaded. Subfolders are created based on the List Item ID.

Code Sample

using System.IO;
using Microsoft.SharePoint; //Located: C:\Program Files\Common Files\microsoft shared\web server extensions\12\ISAPI
...
static void Main(string[] args)
{
try
{
DownloadListAttachments(@"http://portalname/webname/", "listname", @"c:\Temp\Attachments\");
}
catch (Exception ex)
{
//TODO: Handle exception
}
}


public void DownloadListAttachments(string siteUrl, string listName, 
string downloadLocation)
{
string downloadItemLocation = string.Empty;
using (SPSite site = new SPSite(siteUrl))
{
using (SPWeb web = site.OpenWeb())
{
foreach (SPFolder folder in
web.Folders["Lists"].SubFolders[listName].SubFolders["Attachments"].SubFolders)
{
foreach (SPFile file in folder.Files)
{
byte[] binFile = file.OpenBinary();
downloadItemLocation = downloadLocation + "\\" + folder.Name + "\\";
if (!Directory.Exists(downloadItemLocation))
{
Directory.CreateDirectory(downloadItemLocation);
}
System.IO.FileStream fstream =
System.IO.File.Create(downloadItemLocation + file.Name);
fstream.Write(binFile, 0, binFile.Length);
}
}
}
}
}


Screenshots
image


image 


image


image


References 
How to programmatically download attachments from list items in Windows SharePoint Services

Monday, February 15, 2010

Localizing resources in a Silverlight Business Application

As a speaker of a foreign language and a former software tester for many localization projects, I have a continued interest in how to globalize and localize my applications. Fortunately, it has gotten much easier through the years as operating systems have become more accommodating to things like DBCS and bidirectional support. .NET has also continued to improve by adding better resource integration support and fortunately Silverlight is no exception in using this functionality.

Unlike with 3.0, Silverlight 4.0 provides a “ResourceWrapper.cs” class by default which encapsulates your resource references and binds the navigation elements out of the box. With only a few extra steps, you can fully globalize an application which will allow you to easily switch between languages on the fly.

image


Instructions

1. Open Visual Studio and create a “Silverlight Business Application.” (Note: If you are creating any other type of Silverlight application, I recommend seeing Tim Heuer’s blog entry mentioned below.)
2. Update the project file to support multiple languages.
i. Save the application and close Visual Studio.
ii. Open the Silverlight csproj file in notepad.
iii. Add as many culture names as will be supported. (See below for complete list.)
<SupportedCultures>en-US,ja-JP</SupportedCultures>
iv. Reopen the project in Visual Studio.
3. Add additional resource files for each culture name that you support.
i. Under the Assets –> Resources folder, copy and paste the ApplicationStrings.resx file and rename it using the appropriate culture name. For example, ApplicationStrings.ja-jp.resx would be used for Japanese.
ii. Double click on the resx file and ensure that the “No code generated” is picked for the Access Modifier. You can also delete the corresponding code behind file.
ii. Update the resource file with localized strings. In the following example, I have added a resource for Japanese and translated a few items.
image
iv. VERY IMPORTANT: If you add additional strings to your resource files, you will need to go into the original ApplicationStrings.Designer.cs file and ensure that the constructor is set to “public”. There is a bug in Visual Studio that changes it to “internal”. As of Visual Studio 2010 Beta 2, this is still a problem.

image
v. Binding is done in xaml with the following example.

Content="{BindingPath=ApplicationStrings.MyNewString, Source={StaticResource ResourceWrapper}}"

4. Update the ResourceWrapper.cs file to implement the INotifyPropertyChanged interface.

using
System.ComponentModel;
public sealed classResourceWrapper : INotifyPropertyChanged
{
private staticApplicationStrings applicationStrings = new ApplicationStrings();
private static SecurityQuestions securityQuestions = new SecurityQuestions();

public ApplicationStrings ApplicationStrings
{
get { return applicationStrings; }
set { OnPropertyChanged("ApplicationStrings"); }
}

public SecurityQuestions SecurityQuestions
{
get { return securityQuestions; }
set { OnPropertyChanged("SecurityQuestions"); }
}

public event PropertyChangedEventHandler PropertyChanged;

private void OnPropertyChanged(string propertyName)
{
if (PropertyChanged != null)
{
PropertyChanged(this, new PropertyChangedEventArgs(propertyName));
}
}
}

5. Add a UI element for changing languages. In this example, I us a ComboBox.
i. Copy and paste the following code in the MainPage.xaml file after the “About” button.

   <ComboBox Name="Language" SelectionChanged="Language_SelectionChanged">
<
ComboBoxItem Content="English" Tag="en-US" IsSelected="True" />
<
ComboBoxItem Content="日本語" Tag="ja-JP" />
</
ComboBox>

ii. Add the following code behind.

private void Language_SelectionChanged(object sender, SelectionChangedEventArgs e)
{
Thread.CurrentThread.CurrentCulture =
new CultureInfo(((ComboBoxItem)((ComboBox)sender).SelectedItem).Tag.ToString());
Thread.CurrentThread.CurrentUICulture =
new CultureInfo(((ComboBoxItem)((ComboBox)sender).SelectedItem).Tag.ToString());
((ResourceWrapper)App.Current.Resources["ResourceWrapper"]).ApplicationStrings =
new ApplicationStrings();
}
Run your application…
image 
image 
References
Tim Heuer - Silverlight and localizing string data - Although Tim’s example is for 3.0, I used it quite liberally in this post. I give Tim full credit for helping me understand how localization works in Silverlight.
Table of Language Culture Names, Codes, and ISO Values Method [C++]

Display Name Culture Name
Afrikaans - South Africa af-ZA
Albanian - Albania sq-AL
Arabic - Algeria ar-DZ
Arabic - Bahrain ar-BH
Arabic - Egypt ar-EG
Arabic - Iraq ar-IQ
Arabic - Jordan ar-JO
Arabic - Kuwait ar-KW
Arabic - Lebanon ar-LB
Arabic - Libya ar-LY
Arabic - Morocco ar-MA
Arabic - Oman ar-OM
Arabic - Qatar ar-QA
Arabic - Saudi Arabia ar-SA
Arabic - Syria ar-SY
Arabic - Tunisia ar-TN
Arabic - United Arab Emirates ar-AE
Arabic - Yemen ar-YE
Armenian - Armenia hy-AM
Azeri (Cyrillic) - Azerbaijan Cy-az-AZ
Azeri (Latin) - Azerbaijan Lt-az-AZ
Basque - Basque eu-ES
Belarusian - Belarus be-BY
Bulgarian - Bulgaria bg-BG
Catalan - Catalan ca-ES
Chinese - China zh-CN
Chinese - Hong Kong SAR zh-HK
Chinese - Macau SAR zh-MO
Chinese - Singapore zh-SG
Chinese - Taiwan zh-TW
Chinese (Simplified) zh-CHS
Chinese (Traditional) zh-CHT
Croatian - Croatia hr-HR
Czech - Czech Republic cs-CZ
Danish - Denmark da-DK
Dhivehi - Maldives div-MV
Dutch - Belgium nl-BE
Dutch - The Netherlands nl-NL
English - Australia en-AU
English - Belize en-BZ
English - Canada en-CA
English - Caribbean en-CB
English - Ireland en-IE
English - Jamaica en-JM
English - New Zealand en-NZ
English - Philippines en-PH
English - South Africa en-ZA
English - Trinidad and Tobago en-TT
English - United Kingdom en-GB
English - United States en-US
English - Zimbabwe en-ZW
Estonian - Estonia et-EE
Faroese - Faroe Islands fo-FO
Farsi - Iran fa-IR
Finnish - Finland fi-FI
French - Belgium fr-BE
French - Canada fr-CA
French - France fr-FR
French - Luxembourg fr-LU
French - Monaco fr-MC
French - Switzerland fr-CH
Galician - Galician gl-ES
Georgian - Georgia ka-GE
German - Austria de-AT
German - Germany de-DE
German - Liechtenstein de-LI
German - Luxembourg de-LU
German - Switzerland de-CH
Greek - Greece el-GR
Gujarati - India gu-IN
Hebrew - Israel he-IL
Hindi - India hi-IN
Hungarian - Hungary hu-HU
Icelandic - Iceland is-IS
Indonesian - Indonesia id-ID
Italian - Italy it-IT
Italian - Switzerland it-CH
Japanese - Japan ja-JP
Kannada - India kn-IN
Kazakh - Kazakhstan kk-KZ
Konkani - India kok-IN
Korean - Korea ko-KR
Kyrgyz - Kazakhstan ky-KZ
Latvian - Latvia lv-LV
Lithuanian - Lithuania lt-LT
Macedonian (FYROM) mk-MK
Malay - Brunei ms-BN
Malay - Malaysia ms-MY
Marathi - India mr-IN
Mongolian - Mongolia mn-MN
Norwegian (Bokmål) - Norway nb-NO
Norwegian (Nynorsk) - Norway nn-NO
Polish - Poland pl-PL
Portuguese - Brazil pt-BR
Portuguese - Portugal pt-PT
Punjabi - India pa-IN
Romanian - Romania ro-RO
Russian - Russia ru-RU
Sanskrit - India sa-IN
Serbian (Cyrillic) - Serbia Cy-sr-SP
Serbian (Latin) - Serbia Lt-sr-SP
Slovak - Slovakia sk-SK
Slovenian - Slovenia sl-SI
Spanish - Argentina es-AR
Spanish - Bolivia es-BO
Spanish - Chile es-CL
Spanish - Colombia es-CO
Spanish - Costa Rica es-CR
Spanish - Dominican Republic es-DO
Spanish - Ecuador es-EC
Spanish - El Salvador es-SV
Spanish - Guatemala es-GT
Spanish - Honduras es-HN
Spanish - Mexico es-MX
Spanish - Nicaragua es-NI
Spanish - Panama es-PA
Spanish - Paraguay es-PY
Spanish - Peru es-PE
Spanish - Puerto Rico es-PR
Spanish - Spain es-ES
Spanish - Uruguay es-UY
Spanish - Venezuela es-VE
Swahili - Kenya sw-KE
Swedish - Finland sv-FI
Swedish - Sweden sv-SE
Syriac - Syria syr-SY
Tamil - India ta-IN
Tatar - Russia tt-RU
Telugu - India te-IN
Thai - Thailand th-TH
Turkish - Turkey tr-TR
Ukrainian - Ukraine uk-UA
Urdu - Pakistan ur-PK
Uzbek (Cyrillic) - Uzbekistan Cy-uz-UZ
Uzbek (Latin) - Uzbekistan Lt-uz-UZ
Vietnamese - Vietnam vi-VN

Thursday, February 11, 2010

Tip: Easily update hosts file using batch files

1.  Open notepad.
2.  Enter the following at the top to ensure a carriage return.

    echo. >>%WINDIR%\System32\drivers\etc\hosts

3.  Enter as many host entries as you need using the following syntax:

echo [IPADDRESS][TAB][HOSTNAME]>>%WINDIR%\System32\drivers\etc\host

image

4. Optional:  If you want notepad to automatically open up the hosts file when you are finished, you can also add this command at the end.

start notepad %WINDIR%\System32\drivers\etc\hosts

5.  Save the file with a .bat extension.
6.  Double-click on the file.
7.  If all goes as expected, your hosts file should now look like this.

image

Thursday, February 4, 2010

“Windows 7 USB/DVD Download Tool” Where have you been all these years?

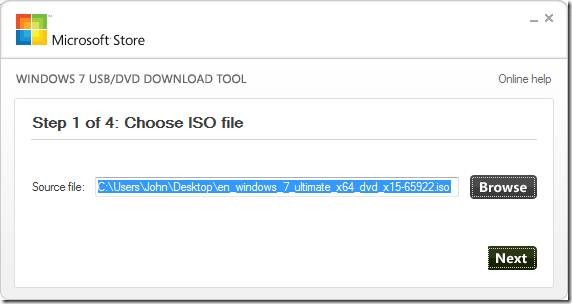
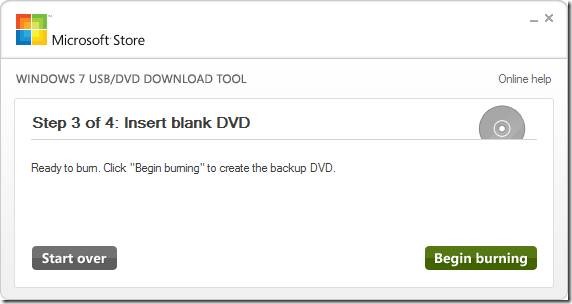
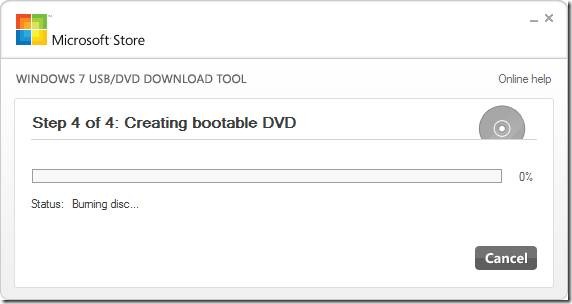
After years of messing around with WinZip, 7-Zip, WinRAR, Roxio, Nero, among others, and never mind the other random assortment of sometimes sketchy file decompression crapware, there is finally a simple tool the simple take of making a bootable USB or DVD from an ISO. Using this tool, I was able to successfully install Windows 7, the 64-bit version no less. Although the tool comes from the Microsoft Store, I was able to use it with an ISO file from my MSDN subscription.

Download Here:  Windows 7 USB/DVD Download Tool

clip_image002

clip_image004

clip_image006

clip_image008image

Submit a new InfoPath form to a SharePoint Form Library Programmatically

Let me first start out by saying that if anyone has a better way to do this I am all ears. As far as I’m concerned this isn’t an ideal solution, but after scouring the web I simply could not find a different approach.

Requirements
The ability to programmatically add a new InfoPath form to a SharePoint Form Library using one of the content type templates that have been defined in the same Form Library.

Summary
The reason I need this functionality is because I have developed a very complicated and interactive Silverlight form that will have a number of dependent InfoPath forms. I needed a way to generate these on the fly whenever a new record was created and then to be able to reference them. Adding a file to a Form Library is pretty trivial, but getting an InfoPath template from a Form Library is not out of the box. This part was critical as the template has the ability to be updated at any time and I wanted to make sure I was always using a valid one.

A special thanks to Mike Hodnick for providing the code for retrieving the InfoPath template.
Programmatically create an InfoPath form instance from XSN template

UPDATE: It turns out this solution will only work with the root site and not other site collections in the same farm. Fortunately, there is a work around. Keep these steps in mind when following these instructions.
1. Encapsulate the code from GetInfoPathTemplate.aspx into a web part and deploy it to SharePoint.
2. Install the web part on a web part page in the same site collection where the forms will be located.
3. Update the web service to include a parameter for the web part page url.

Create Web Service Project
1. Create an “ASP.NET Web Service Application” project in Visual Studio 2008.
2. Make sure that the assembly is signed with a strongly named key. (Project –> Properties –> Signing –> Sign the assembly)
3. Add a reference to Microsoft.SharePoint (C:\Program Files\Common Files\microsoft shared\web server extensions\12\ISAPI\Microsoft.SharePoint.dll)
4. Add a reference to Microsoft.Office.InfoPath and Microsoft.InfoPath.Server (c:\Program Files\Microsoft Office Servers\12.0\Bin)
5. Add Web Form to the project. I have called mine GetInfoPathTemplate.aspx.
6. Add a single PlaceHolder control to the page in design view. This will be used to instantiate an InfoPath form and will allow us to retrieve the template xml.

<%@ Page Language="C#" AutoEventWireup="true" CodeBehind="GetInfoPathTemplate.aspx.cs" Inherits="Acme.Services.InfoPath.GetInfoPathTemplate" %>
<!DOCTYPE html PUBLIC "-//W3C//DTD XHTML 1.0 Transitional//EN" "http://www.w3.org/TR/xhtml1/DTD/xhtml1-transitional.dtd">
<
html xmlns="http://www.w3.org/1999/xhtml">
<
head runat="server">
<
title></title>
</
head>
<
body>
<
form id="form1" runat="server">
<
div>
<
asp:PlaceHolder ID="formHostPlaceholder" runat="server" />
</
div>
</
form>
</
body>
</
html>

7. Add the code behind for the page. You will see that it takes a query string called “templateUrl”. (Note: I haven’t add exception handling yet.)

using System;
using System.IO;
using Microsoft.Office.InfoPath.Server.Controls;

namespace Acme.Services.InfoPath
{
public partial class GetInfoPathTemplate : System.Web.UI.Page
{
protected void Page_Load(object sender, EventArgs e)
{
if (Request.QueryString["templateUrl"] != null)
{
XmlFormView formView = new XmlFormView();
formView.Initialize += new EventHandler<InitializeEventArgs>(formView_Initialize);
string url = Request.QueryString["templateUrl"].ToString();
this.formHostPlaceholder.Controls.Add(formView);
formView.XsnLocation = url;
}
}

void formView_Initialize(object sender, InitializeEventArgs e)
{
XmlFormView formView = sender as XmlFormView;
Stream stream = formView.XmlForm.Template.OpenFileFromPackage("template.xml");
StreamReader reader = new StreamReader(stream);
string xml = reader.ReadToEnd();
this.Response.Clear();
this.Response.ContentType = "text/xml";
this.Response.Write(xml);
this.Response.End();
}
}
}

8. Open up the code behind for the web service and add code for retrieving template names, updating the template xml, and submitting to a SharePoint Form Library.
using System;
using System.Collections.Generic;
using System.IO;
using System.Net;
using System.Text;
using System.Web;
using System.Web.Services;
using System.Xml.Linq;
using Microsoft.SharePoint;

namespace Acme.Services.InfoPath
{
[WebService(Namespace = "http://tempuri.org/")]
[WebServiceBinding(ConformsTo = WsiProfiles.BasicProfile1_1)]
[System.ComponentModel.ToolboxItem(false)]
public class Service : System.Web.Services.WebService
{
[WebMethod]
public bool SubmitInfoPathForm(string templateUrl, string formItemUrl)
{
bool submitted = false;
string infoPathTemplateUrl = string.Empty;
try
{
WebClient client = new WebClient();
client.Credentials = CredentialCache.DefaultCredentials;
infoPathTemplateUrl = GetInfoPathTemplateUrl() + "?templateUrl=" + templateUrl;
Stream stream = client.OpenRead(infoPathTemplateUrl);
StreamReader reader = new StreamReader(stream);
string formXml = UpdateTemplate(templateUrl, reader.ReadToEnd());
ASCIIEncoding encoding = new ASCIIEncoding();
byte[] bytes = encoding.GetBytes(formXml);
using (SPSite site = new SPSite(templateUrl))
{
using (SPWeb web = site.OpenWeb())
{
web.Files.Add(formItemUrl, bytes);
submitted = true;
}
}
}
catch (Exception ex)
{
throw ex;
}
return submitted;
}

[WebMethod]
public string[] GetInfoPathTemplates(string webUrl, string listName)
{
List<string> templates = new List<string>();
using (SPSite site = new SPSite(webUrl))
{
using (SPWeb web = site.OpenWeb())
{
SPList list = web.Lists[listName];
SPContentTypeCollection contentTypes = list.ContentTypes;
foreach (SPContentType contentType in contentTypes)
{
if (contentType.DocumentTemplate.EndsWith(".xsn"))
{
templates.Add(contentType.DocumentTemplate);
}
}
}
}
return templates.ToArray();
}

private string GetInfoPathTemplateUrl()
{
return HttpContext.Current.Request.Url.ToString().Replace("Service.asmx", "GetInfoPathTemplate.aspx");
}

private string UpdateTemplate(string templateUrl, string templateXml)
{
XDocument xDocRoot = XDocument.Parse(templateXml);
IEnumerable<XNode> nodes = xDocRoot.Nodes();
foreach (XNode node in nodes)
{
if (node.ToString().Contains("mso-infoPathSolution")) //Lame, but couldn't find any other way.
{
if (!((XProcessingInstruction)node).Data.Contains("href="))
{
((XProcessingInstruction)node).Data = ((XProcessingInstruction)node).Data + " href=\"" + templateUrl + "\"";
}
break;
}
}
return xDocRoot.Declaration + xDocRoot.ToString();
}
}
}

9. Create a folder called “InfoPathServices” at the level of your SharePoint bin directory and add your web service “Service.asmx” and web form “GetInfoPathTemplate.aspx”. (C:\inetpub\wwwroot\wss\VirtualDirectories\80)

image

10. Register your web service assembly in the GAC and take note of the Public Key Token. (Start –> Run –> assembly)
11. Open the web.config and add a new SafeControl and assembly tag with the Public Key Token in the previous step. (C:\inetpub\wwwroot\wss\VirtualDirectories\80)
<configuration>
<SharePoint>
<SafeControls>
<SafeControl Assembly="Acme.Services.InfoPath, Version=1.0.0.0, Culture=neutral, PublicKeyToken=xxxxxxxxxxxxxxx" Namespace="Acme.Services.InfoPath" TypeName="*" Safe="True" />
</SafeControls>
</SharePoint>
<system.web>
<compilation>
<add assembly="Acme.Services.InfoPath, Version=1.0.0.0, Culture=neutral, PublicKeyToken=xxxxxxxxxxxxxxx" />
</compilation>
</system.web>
</configuration>

Testing

1. Template Retrieval Testing - Test the web application by opening the URL with the query string to a valid template url.

http://[portalname]/InfoPathService/GetInfoPathTemplate.aspx?templateUrl=http://[portalname]/[form libraryname]/Forms/[reporttemplatename].xsn

It should look something like this:


image


2. For the rest, you can simply create a Console Application that references the web service. Here is an example I have provided. You will need four parameters:

Web Url – Base URL where your list is located.
List Name – Name of your form library.
Content Type Name – The name of your report template.
List Item Name – This is the name that you will be giving your report.

using System;
using System.Collections.Generic;
using System.Linq;
using System.Net;
using Microsoft.SharePoint;
using Acme.Services.InfoPath.Tester.InfoPathService;

namespace Acme.Services.InfoPath.Tester
{
class Program
{
static void Main(string[] args)
{
string webUrl = @"http://[portalname]/[teamsitename]/";
string listName = "[formlibraryname]";
string contentTypeName = "[reportname]";
string listItemName = Guid.NewGuid().ToString();
try
{
SubmitInfoPath(webUrl, listName, contentTypeName, listItemName);
}
catch (Exception ex)
{
//todo: handle exception
}
}

static void SubmitInfoPath(string webUrl, string listName, string contentTypeName, string listItemName)
{
string templateUrl = GetTemplateUrl(webUrl, listName, contentTypeName);
string itemUrl = string.Format(webUrl + listName + "/" + listItemName + ".xml");
if (!string.IsNullOrEmpty(templateUrl))
{
Service sc = new Service();
sc.Credentials = CredentialCache.DefaultNetworkCredentials;
sc.SubmitInfoPathForm(templateUrl, itemUrl);
}
else
{
throw new Exception("Content type does not exist.");
}
}

static string GetTemplateUrl(string listUrl, string listName, string contentTypeName)
{
string templateUrl = string.Empty;
Service sc = new Service();
sc.Credentials = CredentialCache.DefaultNetworkCredentials;
string[] templates = sc.GetInfoPathTemplates(listUrl, listName);
templateUrl = (from t in templates where t.Contains(contentTypeName) select t).Single();
return templateUrl;
}

public static string[] GetInfoPathTemplates(string webUrl, string listName)
{
List<string> templates = new List<string>();
using (SPSite site = new SPSite(webUrl))
{
using (SPWeb web = site.OpenWeb())
{
SPList list = web.Lists[listName];
SPContentTypeCollection contentTypes = list.ContentTypes;
foreach (SPContentType contentType in contentTypes)
{
if (contentType.DocumentTemplate.EndsWith(".xsn"))
{
templates.Add(contentType.DocumentTemplate);
}
}
}
}
return templates.ToArray();
}
}
}
Assuming you did everything right, you should start seeing items in your form library!
image