If you have used Visual Studio 2005 long enough and have had to debug on various machines with various configurations, it is very likely that your Visual Studio environments aren't exactly the same and have different service packs and extensions. One of the errors I commonly get is something to the affect that the "project type is not supported." Unfortunately, the message is very cryptic and provides no information by resolving the issue.
Basically what this means is you are missing project templates for the project type you are trying to load. This could be the notorious
Web Application Project type that was not a default project type in Visual Studio 2005 or it could be something like the
Visual Studio extensions for .NET Framework 3.0. Either way you need to find out what project type you are missing and then get it installed.
Check your csproj file
- Open the csproj file in Notepad.
- Find the node . It is under .
- This is the GUID that corresponds to a project template type.
- If you are fortunate enough to have access to the machine where the project was created, you can open the registry and then find what type of project template it is. Otherwise you can try Google or consult my ongoing list below.
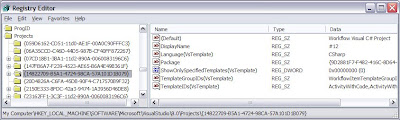
Check your Registry
- Open Start - Run, type regedit, and click OK.
- Navigate to: HKLM\SOFTWARE\Microsoft\VisualStudio\8.0\Projects
- Here you will find a list of all your project templates that are installed. (Note: These are all installed in "[Install Directory]\Program Files\Microsoft Visual Studio 8\Common7\IDE\ProjectTemplates")
- The Default string value data is the name of the project you need. You can usually
Alternate Resolution
If you have access to both machines you are trying to synchronize, one alternative is to open Visual Studio and click on About Microsoft Visual Studio from the Help menu. From here you can compare versions and installed products. However, you may end up spending a lot of time installing various products when you only need one thing installed.
Get List of Installed Visual Studio Project Templates using C#
This is a little C# code snippet you can use to get a list of installed project templates:
using Microsoft.Win32;
private string GetProjectTemplateTypes()
{
string projectTemplateRegDir = @"SOFTWARE\Microsoft\VisualStudio\8.0\Projects";
string[] projectGuids =
Registry.LocalMachine.OpenSubKey(projectTemplateRegDir).GetSubKeyNames();
string projectTemplateList = "";
foreach (string projectGuid in projectGuids)
{
projectTemplateList +=
projectGuid + "\t" +
Registry.LocalMachine.OpenSubKey(projectTemplateRegDir +
"\\" + projectGuid).GetValue("") + "\r\n";
}
return projectTemplateList;
}
Visual Studio Project Template GUID List
This is a list of project templates I have installed on my machine. This is not a complete list, but gives you all of the basic ones plus some of extras like .NET 3.0 templates. If you have any new ones, please send them and I will add them.
| {059D6162-CD51-11d0-AE1F-00A0C90FFFC3} | Project Converter |
| {06A35CCD-C46D-44D5-987B-CF40FF872267} | Visual Studio Deployment Merge Module Project |
| {07CD18B1-3BA1-11d2-890A-0060083196C6} | Macro Solution |
| {147FB6A7-F239-4523-AE65-B6A4E49B361F} | Visual Studio Tools for Office CSharp Project |
| {14822709-B5A1-4724-98CA-57A101D1B079} | Workflow Visual C# Project |
| {20D4826A-C6FA-45DB-90F4-C717570B9F32} | Legacy Smart Device C# Project |
| {2150E333-8FDC-42a3-9474-1A3956D46DE8} | Solution Folder Project |
| {23162FF1-3C3F-11d2-890A-0060083196C6} | Macro Project |
| {2606E7C9-5071-4B63-9A83-C66A32B1669F} | Visual Studio Tools for Office VisualBasic Project |
| {3114F5B0-E435-4bc5-A03D-168E20D9BF83} | Smart Device Visual Basic Virtual Project for .Net Compact Framework v2.0 |
| {349c5851-65df-11da-9384-00065b846f21} | Web Application Project Factory |
| {349c5853-65df-11da-9384-00065b846f21} | C# Web Application Project Templates |
| {349c5854-65df-11da-9384-00065b846f21} | VB Web Application Project Templates |
| {349c5855-65df-11da-9384-00065b846f21} | J# Web Application Project Templates |
| {35F59093-63D9-4a89-B699-B64FAADAEEFB} | Smart Device Visual Basic Virtual Project for .Net Compact Framework v1.0 |
| {3b0d21b2-944d-4169-b2d5-f85948276507} | VDT Project Flavor CS Templates |
| {3EA9E505-35AC-4774-B492-AD1749C4943A} | Visual Studio Deployment Cab Project |
| {4D628B5B-2FBC-4aa6-8C16-197242AEB884} | Smart Device C# Project |
| {4F174C21-8C12-11D0-8340-0000F80270F8} | #6025 |
| {54435603-DBB4-11D2-8724-00A0C9A8B90C} | Visual Studio Deployment Project |
| {66355F20-A65B-11D0-BFB5-00A0C91EBFA0} | VJ6 Project System |
| {68B1623D-7FB9-47D8-8664-7ECEA3297D4F} | Smart Device Visual Basic Project |
| {7C3490A3-8632-43C5-8A60-07DC2F450870} | #118 |
| {8040559B-8C3E-411d-BB63-674DC53550CD} | Smart Device C# Virtual Project for .Net Compact Framework v2.0 |
| {82c448b6-9d85-47d0-a1bc-01c5d8802d46} | VDT Project Flavor VB Templates |
| {84F32C53-93DA-46fd-993C-0C1875CBF4E6} | Smart Device C# Virtual Project for .Net Compact Framework v1.0 |
| {8BC9CEB8-8B4A-11D0-8D11-00A0C91BC942} | #10006 |
| {8BC9CEB9-8B4A-11D0-8D11-00A0C91BC942} | Exe Projects |
| {8BC9CEB9-9B4A-11D0-8D11-00A0C91BC942} | Crash Dump Projects |
| {8BC9CEBA-8B4A-11D0-8D11-00A0C91BC942} | #10008 |
| {978C614F-708E-4E1A-B201-565925725DBA} | Visual Studio Deployment Setup Project |
| {999D2CB9-9277-4465-A902-1604ED3686A3} | Report Model Project |
| {A2FE74E1-B743-11d0-AE1A-00A0C90FFFC3} | Miscellaneous Files Project |
| {AB322303-2255-48EF-A496-5904EB18DA55} | Visual Studio WinCE Deployment Project |
| {B900F1C2-3D47-4FEC-85B3-04AAF18C3634} | Visual Studio Smart Device Cab Project |
| {BAA0C2D2-18E2-41b9-852F-F413020CAA33} | Visual Studio Tools for Office Project |
| {BDD4A1A1-7A1F-11D0-AC13-00A0C91E29D5} | |
| {c252feb5-a946-4202-b1d4-9916a0590387} | VDT Project Flavor |
| {CB4CE8C6-1BDB-4DC7-A4D3-65A1999772F8} | Legacy Smart Device Visual Basic Project |
| {d183a3d8-5fd8-494b-b014-37f57b35e655} | Data Transformations Project |
| {D1DCDB85-C5E8-11d2-BFCA-00C04F990235} | Solution Items Project |
| {D24BA5B7-7536-40BB-A637-5337AA82183D} | Visual Studio Deployment Tier Project |
| {d2abab84-bf74-430a-b69e-9dc6d40dda17} | Analysis Services Project |
| {D59BE175-2ED0-4C54-BE3D-CDAA9F3214C8} | Workflow Visual Basic Project |
| {E24C65DC-7377-472B-9ABA-BC803B73C61A} | #2143 |
| {E502E3C0-BAAE-11D0-88BF-00A0C9110049} | |
| {E6FDF86B-F3D1-11D4-8576-0002A516ECE8} | #2346 |
| {F14B399A-7131-4c87-9E4B-1186C45EF12D} | #5001 |
| {F184B08F-C81C-45f6-A57F-5ABD9991F28F} | #2143 |
| {FAE04EC0-301F-11d3-BF4B-00C04F79EFBC} | #2346 |
| {FB4431D6-6095-4d6f-8D01-6135C978F700} | Enterprise Template Project |
| {FE3BBBB6-72D5-11d2-9ACE-00C04F79A2A4} | Design Time Policy Project Aggregator |


