When you use a DataGridViewImage column within a DataGridView, a red "x" will show up if you do not anything bound to the row in question. What this means is that if you have an edit row at the end, it will show the red "x". Unfortunately, neither the official documentation for DataGridViewImageColumn in MSDN nor the forum are very clear on this. I gleaned off one of the last posts which recommended creating a new blank bitmap. Instead, I set my cell value to the value of the image I already set up in designer. For a DataGridView that is not getting databound, you will need to put this in the form load.
private void myGrid_DataBindingComplete(object sender, DataGridViewBindingCompleteEventArgs e)
{
//assumes that image column is first column
myGrid.Rows[myGrid.Rows.Count - 1].Cells[0].Value =
((DataGridViewImageColumn) myGrid.Columns[0]).Image;
}
Monday, December 17, 2007
Experts Exchange - Officially Banned!
This used to be a great site, but is now full of pop-ups and annoying ads.
http://www.experts-exchange.com/
http://www.experts-exchange.com/
Thursday, December 13, 2007
Windows Vista - Windows Update reboot prompts during separate installation.
Dear Windows Vista,
Why do you ask me to reboot when I'm in the middle of installing something? What's confusing here is that I don't know if this is related to the Visual Studio 2008 install or something else that was being installed in the background. Don't get me wrong, I am a fan of the silent updates, but it would be nice to understand what's going on here. Alas, the VS installation progress bar is still moving...

Why do you ask me to reboot when I'm in the middle of installing something? What's confusing here is that I don't know if this is related to the Visual Studio 2008 install or something else that was being installed in the background. Don't get me wrong, I am a fan of the silent updates, but it would be nice to understand what's going on here. Alas, the VS installation progress bar is still moving...

Wednesday, December 5, 2007
MOSS 2007 Overrides GridView Header in Web Part
I had created a Web Part with a GridView and explicitly set the header background color to dark blue and the forecolor to white.
<asp:GridView ID="UserGroupsTable" runat="server" >
lt;HeaderStyle BackColor="#006699" Font-Bold="True" ForeColor="White" />
</asp:GridView>
Unfortunately, SharePoint overrode the style somehow with the core.css file. After a bit of troubleshooting in SharePoint designer, I got it working by overriding the CSS for the web part page.
.ms-propertysheet th
{
color:white;
}
For more information on MOSS 2007 CSS, check out Heather's site:
Heather Solomon - CSS Reference Chart
Thursday, November 29, 2007
Essential Dowloads - 2007 November (In no particular order)
- Microsoft Vista
- Microsoft Office 2007
- Microsoft Visual Studio 2005
- Microsoft Visual Studio 2008
- Best Buy Digital Music Store - Real Networks Rhapsody
- Mozilla Firefox
- Adobe Reader
- Google Talk
- Google Earth
- Google Toolbar
- Skype
- Windows Live Messenger
- Paint.NET
- Google Picasa
- Microsoft IntelliPoint
- Microsoft IntelliType Pro
- Real Networks Real Player
- Apple iTunes
Optional:
Tuesday, November 27, 2007
Multimon using Remote Desktop
This has got to be one of the coolest (geek) things I’ve found all year. If you have two monitors and want to emulate multimon environment from a remote server, you can do it by running the following from Start - Run menu.
mstsc /w:2560 /h:1024 /v:servername
These options aren’t available if you open the standard Remote Desktop dialog, but you can get around it by using the parameters.
Note: The only kicker is that if you try to maximize a window of a given application (i.e., Internet Explorer), it will maximize to both screens. To set the default, open IE and position where you want it to be. Then hold down the ALT key and close it. The next time you open IE, it will open it in the same place.
Customize Windows Start Run Menu Entries - App Paths
I am a huge fan of keyboard shortcuts and am constantly trying to learn new ones. One of the ones I use most often is Start+R which opens the Run menu where I can enter many different things. Here are a few examples:
- devenv - Visual Studio
- inetcpl.cpl - Internet Explorer Options
- mstsc - Remote Desktop
- inetmgr - IIS
- notepad - Notepad
- regedit - Windows Registry
However, sometimes I want to customize my own entries with things like Paint.NET, Visual Source Safe, or Notepad++. Fortunately, I can do this using the Windows Registry. As always when you are working with Windows Registry, you want to make sure to create a backup before you make any changes. See the Microsoft Knowledge Base article below for more details. As far as adding custom Run entries, here are the steps:
- Open the Windows Registry.
- Create a backup. (See below for details)
- Open the following registry key - HKEY_LOCAL_MACHINE\Software\Microsoft\Windows\CurrentVersion\App Paths
- Create a new key with the name of the shortcut you'd like to use. (For example, "VSS.exe")
- Double-click on the (Default) string that is created and enter the path to the application executable that you are adding the shortcut for. (For example, "C:\Program Files\Microsoft Visual SourceSafe\ssexp.exe")
- Close the registry. You will now be able to access the shortcut.
How to back up and restore the registry in Windows XP and Windows Vista
Sunday, November 25, 2007
Resolving an embedded Control ID in JavaScript
One of the great things about ASP.NET is that you have the ability to incorporate things like MasterPages, UserControls, and WebParts in your pages. Unfortunately, if you ever decide to do some client-side scripting for validation, AJAX, or any other reason, it becomes very cumbersome if you have to retrieve a given control's id. The old document.getElementById syntax isn't going to cut it. Fortunately, you can embed some handy ASP.NET rendering code syntax in your JavaScript to do the trick. Here's a simple example:
<asp:button id="ClickMe" runat="server" onmouseover="javascript:toggleMyControlColor();" onmouseout="javascript:toggleMyControlColor();" Text="Click Me" / >
function toggleMyControlColor()
{
var myControl = $get('<%= ClickMe.ClientID %>');
if(myControl.styles.backgroundColor == 'red')
{
myControl.styles.backgroundColor = 'blue'
}
else
{
myControl.styles.backgroundColor = 'red'
}
}
I have used this technique in MasterPages, UserControls, and WebParts (including those hosted in SharePoint), and it works like a charm.
Microsoft Word - Single-Spaced Paragraphs Convert to Double-Spaced in HTML
I found this nice little snippet below. I was hoping this would help me with the Word 2007 blog feature (which is loosely integrated with Blogger) but unfortunately this prevents you from being able to tab. Nevertheless, it's a nice tip to know.
WD98: Single-Spaced Paragraphs Convert to Double-Spaced in HTML
Prior to saving your document in HTML format, change the paragraph marks to manual line breaks. To do this, follow these steps:
- Open your Word document.
- On the Edit menu, click Replace. If there is a More button, click it.
- In the Find What box, click Special, and then click Paragraph Mark. The ^p character will appear in the Find What box.
- In the Replace With box, click Special, and then click Manual Line Break. The ^l character will appear in the Replace With box.
- Click Replace All, click OK, and then click Close.
Formatting C# for Blogger
I have looked into a number of ways to do this, but ended up going with a 3rd party tool that already provides 99% of the functionality. The only drawback was the fact that spaces default to and Blogger randomly deletes these. If you'd like to start working on your own, you can start using the code snippet I have below. Unfortunately, this only highlights C# Keywords and nothing else. You can also download the source code for CopySourceAsHtml, which has a Rtf parsing approach.
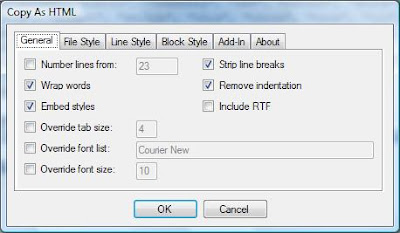
Copy Source As Html Visual Studio Add-In
- Download CopySourceAsHtml Visual Studio Add-In. (As of this writing, only available for 2005).
- Install the Add-In in Visual Studio. (I had to restart Visual Studio after installing, but this may have something to do with Windows Vista interoperability.)
- Select some code and then pick "Copy as HTML" from the content menu item that appears. (Due to a bug in the Blogger html parser that randomly deletes spaces ( ), you will want to do steps 3-4. This will ensure that the tabs are preserved. Otherwise, you will find that tabs may disappear after you try to edit the post later on.)
- When the "Copy as HTML" dialog appears, ensure that only the following checkboxes are selected: "Wrap Words", "Embed Styles", "Strip line breaks", "Remove indentation".
- Paste the text into Notepad and then replace with <span style='margin-left:2em' />
- Copy the results into Blogger.
- If you want to add comments above or below, make sure you are in Edit Html mode and add text before or after the markup. You can then switch to Compose mode.
Create Your Own Parser
This is a very simple code snippet that could be used to start your own parser. It does create Blogger friendly tabs, but only highlights keywords. (Note: the following code was posted using the first approach.)
private string UpdateBloggerHTML(string plainToHtml)
{
string[] cSharpKeywords = {"using", "abstract", "as", "base", "bool", "break", "byte", "case", "catch", "char", "checked",
"class", "const", "continue", "decimal", "default", "delegate", "do", "double", "else", "enum", "event", "explicit",
"extern", "false", "finally", "fixed", "float", "for", "foreach", "goto", "if", "implicit", "in", "int", "interface",
"internal", "is", "lock", "long", "namespace", "new", "null", "object", "operator", "out", "override", "params",
"private", "protected", "public", "readonly", "ref", "return", "sbyte", "sealed", "short", "sizeof", "stackalloc",
"static", "string", "struct", "switch", "this", "throw", "true", "try", "typeof", "uint", "ulong", "unchecked",
"unsafe", "ushort", "using", "virtual", "void", "volatile", "while"};
plainToHtml = plainToHtml.Replace("\r\n", "<br />");
plainToHtml = plainToHtml.Replace(" ", "<span style='margin-left: 1em;' />");
string newKeyword = "";
foreach (string cSharpKeyword in cSharpKeywords)
{
newKeyword = @"\b" + cSharpKeyword + @"\b";
plainToHtml = Regex.Replace(plainToHtml, newKeyword, "<font style='color:#0000FF'>" + cSharpKeyword + "</font>");
}
return plainToHtml;
}
Friday, July 27, 2007
Speed Up Windows Start Menu
Did you know that you can speed up your Window's Start Menu? It is pretty hard to comprehend, but someone at Microsoft actually thought it would be a good idea to slow down the menus. For those of you would prefer faster menus, do the following:
- Open the Start Menu, type regedit, and click OK.
- Navigate to HKEY_CURRENT_USER\Control Panel\Desktop and look for MenuShowDelay value. If it is not there you can create a string value with that name.
- By default it is 400, but you can speed it up exponentially by changing it to 0.
- Once you are done, close the registry. You may have to restart your computer to see a change.
Thursday, July 26, 2007
Break Corporate Policy And (gasp!) Allow Windows Update
I have a very serious confession to make. Sometimes I break corporate security policies in order update my computer. You got to love those corporate security guys and I really think they mean well, but this is one of those things I just can't go along with. Basically, a windows server administrator has the ability to enforce a group policy that prevents users from updating their computers.
This is probably fine for Joe corporate user who may unwittingly download an update that ends up wreaking havoc on his computer. However, as a developer I often need to update my computer so that I can have access to various patches and hot fixes that allow me to (gulp) improve my productivity.
Anyhow, I'm not encouraging anyone to knowingly break their company's security policy. BUT, if you must, here are the steps.
- Open the registry by opening Start - Run, type regedit, and click OK.
- Navigate to the following registry key: HKEY_CURRENT_USER\Software\Microsoft\Windows\CurrentVersion\Policies\Explorer
- If it doesn't exist already, create a new registry DWORD value called NoWindowsUpdate.
- Double click on this value and make sure the value is 0.
- Now you can go to Windows Update!
For more information, see Microsoft Support article:
I especially like this part of the article:
"For corporate users who are connected to a corporate network
To resolve this issue, contact the local system administrator to determine whether Windows Update access is disabled by Group Policy settings."
Visual Studio Project Template GUIDs - (What's up with those "project not supported" errors?)
If you have used Visual Studio 2005 long enough and have had to debug on various machines with various configurations, it is very likely that your Visual Studio environments aren't exactly the same and have different service packs and extensions. One of the errors I commonly get is something to the affect that the "project type is not supported." Unfortunately, the message is very cryptic and provides no information by resolving the issue.
Basically what this means is you are missing project templates for the project type you are trying to load. This could be the notorious Web Application Project type that was not a default project type in Visual Studio 2005 or it could be something like the Visual Studio extensions for .NET Framework 3.0. Either way you need to find out what project type you are missing and then get it installed.
Check your csproj file
- Open the csproj file in Notepad.
- Find the
node . It is under . - This is the GUID that corresponds to a project template type.
- If you are fortunate enough to have access to the machine where the project was created, you can open the registry and then find what type of project template it is. Otherwise you can try Google or consult my ongoing list below.
Check your Registry
- Open Start - Run, type regedit, and click OK.
- Navigate to: HKLM\SOFTWARE\Microsoft\VisualStudio\8.0\Projects
- Here you will find a list of all your project templates that are installed. (Note: These are all installed in "[Install Directory]\Program Files\Microsoft Visual Studio 8\Common7\IDE\ProjectTemplates")
- The Default string value data is the name of the project you need. You can usually

Alternate Resolution
If you have access to both machines you are trying to synchronize, one alternative is to open Visual Studio and click on About Microsoft Visual Studio from the Help menu. From here you can compare versions and installed products. However, you may end up spending a lot of time installing various products when you only need one thing installed.
Get List of Installed Visual Studio Project Templates using C#
This is a little C# code snippet you can use to get a list of installed project templates:
using Microsoft.Win32;
private string GetProjectTemplateTypes()
{
string projectTemplateRegDir = @"SOFTWARE\Microsoft\VisualStudio\8.0\Projects";
string[] projectGuids =
{
string projectTemplateRegDir = @"SOFTWARE\Microsoft\VisualStudio\8.0\Projects";
string[] projectGuids =
Registry.LocalMachine.OpenSubKey(projectTemplateRegDir).GetSubKeyNames();
string projectTemplateList = "";
foreach (string projectGuid in projectGuids)
{
projectTemplateList +=
projectGuid + "\t" +
string projectTemplateList = "";
foreach (string projectGuid in projectGuids)
{
projectTemplateList +=
projectGuid + "\t" +
Registry.LocalMachine.OpenSubKey(projectTemplateRegDir +
"\\" + projectGuid).GetValue("") + "\r\n";
}
return projectTemplateList;
}
return projectTemplateList;
}
Visual Studio Project Template GUID List
This is a list of project templates I have installed on my machine. This is not a complete list, but gives you all of the basic ones plus some of extras like .NET 3.0 templates. If you have any new ones, please send them and I will add them.
Visual Studio 2005 SP1 - Installation Woes - "did not pass the digital signature check"
I got this error the other day trying to install Visual Studio 2005 SP1:
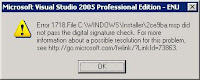
Error 1718. File C:\Windows\Installer\2ce9ba.msp did not pass the digital signature check. For more information about a possible resolution for this problem, see http://go.microsoft.com/fwlink/?LinkId=73863
The following steps from Microsoft Support worked for me:

Error 1718. File C:\Windows\Installer\2ce9ba.msp did not pass the digital signature check. For more information about a possible resolution for this problem, see http://go.microsoft.com/fwlink/?LinkId=73863
The following steps from Microsoft Support worked for me:
- Click Start, click Run, type regedit, and then click OK.
- In Registry Editor, locate and then click the following registry key:
HKEY_LOCAL_MACHINE\Software\Policies\Microsoft\Windows\Safer\CodeIdentifiersNote Before you modify this key, we recommend that you back up this key. To do this, right-click CodeIdentifiers, and then click Export. Save the file to a location where you can find it on the computer. - Change the PolicyScope registry value. To do this, double-click PolicyScope, and then change the setting from 0 to 1. Note: If this registry value does not exist, create a new DWORD value.
- Close Registry Editor.
- Click Start, click Run, type cmd, and then click OK to open a Command Prompt window.
- At the command prompt, type the following command, and then press ENTER:
net stop msiserverThis command stops the Windows Installer service if the service is currently running in the background. When the service has stopped, close the Command Prompt window, and then go to step 7.Note If you receive the following message at the command prompt, close the Command Prompt window, and then go to step 7:
The Windows Installer service is not started - Try installing again!
Wednesday, April 4, 2007
Anti-Dupe for Microsoft Outlook
Remove duplicate e-mails, contacts, appointments, and tasks. This is very helpful when you need to merge or import Outlook pst files. This free software is provided by Lookout Software, the same company that Microsoft purchased an Outlook search add-in from.
http://www.anti-dupe.com/
http://www.anti-dupe.com/
Tuesday, April 3, 2007
Crack ISO Files with WinRAR
I have always had pretty good luck with Microsoft's Virtual CD Control Panel, but I have always had a problem with the fact that they don't support it. In fact it is not that easy to find and won't even come up if you search from Microsoft Downloads. Fortunately, there is another tool called WinRAR that unzips ISO (among other) files and is a free download. (Interestingly enough, I was told about this tool from an MSDN support technician recently.)
WinRAR
http://www.rarlab.com/
Virtual CD Control Panel
http://support.microsoft.com/kb/916902
Update (11/25/2007) - Works on Windows Vista!
WinRAR
http://www.rarlab.com/
Virtual CD Control Panel
http://support.microsoft.com/kb/916902
Update (11/25/2007) - Works on Windows Vista!
Acronis Migrate Easy - Upgrade your hard drive!
Are you running out of hard drive space or want to upgrade to a faster hard drive? Acronis Migrate Easy makes it easy. I have used this twice before and it has worked excellent.
Steps:
1.) Buy a new drive. I recommended getting the fastest RPM you can afford. Even moving from 4200 to 5400 RPM is quite a performance boost. Even better, see if you can get a flash based drive. Expensive, but quiet and lightning fast.
2.) Buy a hard drive enclosure if you don't already have one. You can then use this to migrate the data using Migrate Easy.
3.) Pick up a copy of Acronis Migrate Easy. Move your data over and swap the drive. Don't forget to format your old drive once you are sure everything has been moved over.
Acronis Migrate Easy
http://www.acronis.com/homecomputing/products/migrateeasy/
Froogle - External Hard Drive Enclosures
http://froogle.google.com/froogle?hl=en&q=external+hard+drive+enclosures&oe=UTF-8&um=1&lmode=online&scoring=p
Monday, April 2, 2007
Array List To Type Array
static void Main(string[] args)
{
ArrayList al = new ArrayList();
al.Add("xxx");
al.Add("zzz");
string[] strArray = (string[])al.ToArray(typeof(string));
}
Subscribe to:
Posts (Atom)