Tuesday, November 27, 2007

Multimon using Remote Desktop

This has got to be one of the coolest (geek) things I’ve found all year. If you have two monitors and want to emulate multimon environment from a remote server, you can do it by running the following from Start - Run menu.

mstsc /w:2560 /h:1024 /v:servername

These options aren’t available if you open the standard Remote Desktop dialog, but you can get around it by using the parameters.

Note: The only kicker is that if you try to maximize a window of a given application (i.e., Internet Explorer), it will maximize to both screens. To set the default, open IE and position where you want it to be. Then hold down the ALT key and close it. The next time you open IE, it will open it in the same place.

Customize Windows Start Run Menu Entries - App Paths

I am a huge fan of keyboard shortcuts and am constantly trying to learn new ones. One of the ones I use most often is Start+R which opens the Run menu where I can enter many different things. Here are a few examples:
  • devenv - Visual Studio
  • inetcpl.cpl - Internet Explorer Options
  • mstsc - Remote Desktop
  • inetmgr - IIS
  • notepad - Notepad
  • regedit - Windows Registry

However, sometimes I want to customize my own entries with things like Paint.NET, Visual Source Safe, or Notepad++. Fortunately, I can do this using the Windows Registry. As always when you are working with Windows Registry, you want to make sure to create a backup before you make any changes. See the Microsoft Knowledge Base article below for more details. As far as adding custom Run entries, here are the steps:

  1. Open the Windows Registry.
  2. Create a backup. (See below for details)
  3. Open the following registry key - HKEY_LOCAL_MACHINE\Software\Microsoft\Windows\CurrentVersion\App Paths
  4. Create a new key with the name of the shortcut you'd like to use. (For example, "VSS.exe")
  5. Double-click on the (Default) string that is created and enter the path to the application executable that you are adding the shortcut for. (For example, "C:\Program Files\Microsoft Visual SourceSafe\ssexp.exe")
  6. Close the registry. You will now be able to access the shortcut.

    How to back up and restore the registry in Windows XP and Windows Vista

Sunday, November 25, 2007

Resolving an embedded Control ID in JavaScript

One of the great things about ASP.NET is that you have the ability to incorporate things like MasterPages, UserControls, and WebParts in your pages. Unfortunately, if you ever decide to do some client-side scripting for validation, AJAX, or any other reason, it becomes very cumbersome if you have to retrieve a given control's id. The old document.getElementById syntax isn't going to cut it. Fortunately, you can embed some handy ASP.NET rendering code syntax in your JavaScript to do the trick. Here's a simple example:

<asp:button id="ClickMe" runat="server" onmouseover="javascript:toggleMyControlColor();" onmouseout="javascript:toggleMyControlColor();" Text="Click Me" / >

function toggleMyControlColor()
{
    var myControl = $get('<%= ClickMe.ClientID %>');
    if(myControl.styles.backgroundColor == 'red')
    {
        myControl.styles.backgroundColor = 'blue'
        }
    else
    {
        myControl.styles.backgroundColor = 'red'
    }
}

I have used this technique in MasterPages, UserControls, and WebParts (including those hosted in SharePoint), and it works like a charm.

Microsoft Word - Single-Spaced Paragraphs Convert to Double-Spaced in HTML

I found this nice little snippet below. I was hoping this would help me with the Word 2007 blog feature (which is loosely integrated with Blogger) but unfortunately this prevents you from being able to tab. Nevertheless, it's a nice tip to know.

WD98: Single-Spaced Paragraphs Convert to Double-Spaced in HTML

Prior to saving your document in HTML format, change the paragraph marks to manual line breaks. To do this, follow these steps:

  1. Open your Word document.
  2. On the Edit menu, click Replace. If there is a More button, click it.
  3. In the Find What box, click Special, and then click Paragraph Mark. The ^p character will appear in the Find What box.
  4. In the Replace With box, click Special, and then click Manual Line Break. The ^l character will appear in the Replace With box.
  5. Click Replace All, click OK, and then click Close.

Formatting C# for Blogger

I have looked into a number of ways to do this, but ended up going with a 3rd party tool that already provides 99% of the functionality. The only drawback was the fact that spaces default to &nbsp; and Blogger randomly deletes these. If you'd like to start working on your own, you can start using the code snippet I have below. Unfortunately, this only highlights C# Keywords and nothing else. You can also download the source code for CopySourceAsHtml, which has a Rtf parsing approach.

Copy Source As Html Visual Studio Add-In

  1. Download CopySourceAsHtml Visual Studio Add-In. (As of this writing, only available for 2005).
  2. Install the Add-In in Visual Studio. (I had to restart Visual Studio after installing, but this may have something to do with Windows Vista interoperability.)
  3. Select some code and then pick "Copy as HTML" from the content menu item that appears. (Due to a bug in the Blogger html parser that randomly deletes spaces (&nbsp;), you will want to do steps 3-4. This will ensure that the tabs are preserved. Otherwise, you will find that tabs may disappear after you try to edit the post later on.)
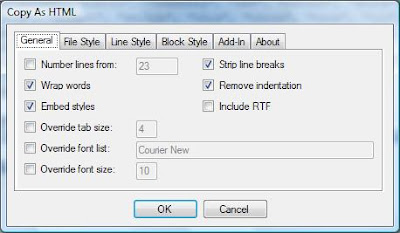
  4. When the "Copy as HTML" dialog appears, ensure that only the following checkboxes are selected: "Wrap Words", "Embed Styles", "Strip line breaks", "Remove indentation".
  5. Paste the text into Notepad and then replace &nbsp; with <span style='margin-left:2em' />
  6. Copy the results into Blogger.
  7. If you want to add comments above or below, make sure you are in Edit Html mode and add text before or after the markup. You can then switch to Compose mode.


Create Your Own Parser

This is a very simple code snippet that could be used to start your own parser. It does create Blogger friendly tabs, but only highlights keywords. (Note: the following code was posted using the first approach.)

private string UpdateBloggerHTML(string plainToHtml)

{

string[] cSharpKeywords = {"using", "abstract", "as", "base", "bool", "break", "byte", "case", "catch", "char", "checked",

"class", "const", "continue", "decimal", "default", "delegate", "do", "double", "else", "enum", "event", "explicit",

"extern", "false", "finally", "fixed", "float", "for", "foreach", "goto", "if", "implicit", "in", "int", "interface",

"internal", "is", "lock", "long", "namespace", "new", "null", "object", "operator", "out", "override", "params",

"private", "protected", "public", "readonly", "ref", "return", "sbyte", "sealed", "short", "sizeof", "stackalloc",

"static", "string", "struct", "switch", "this", "throw", "true", "try", "typeof", "uint", "ulong", "unchecked",

"unsafe", "ushort", "using", "virtual", "void", "volatile", "while"};

plainToHtml = plainToHtml.Replace("\r\n", "<br />");

plainToHtml = plainToHtml.Replace(" ", "<span style='margin-left: 1em;' />");

string newKeyword = "";

foreach (string cSharpKeyword in cSharpKeywords)

{

newKeyword = @"\b" + cSharpKeyword + @"\b";

plainToHtml = Regex.Replace(plainToHtml, newKeyword, "<font style='color:#0000FF'>" + cSharpKeyword + "</font>");

}

return plainToHtml;

}